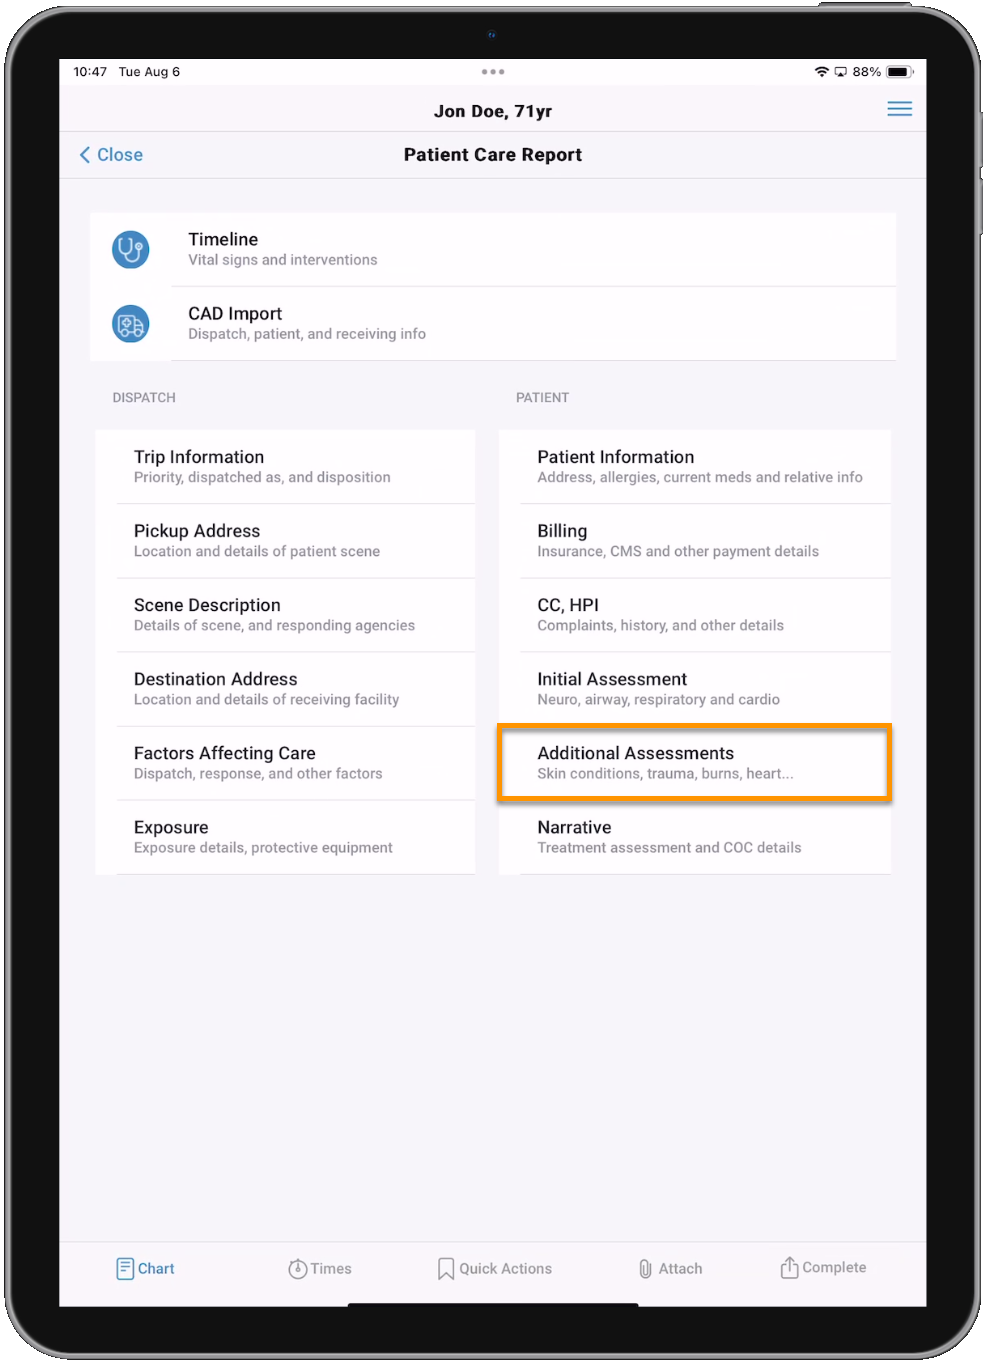
Additional Assessments
The Additional Assessments page is where you can document more detailed Assessment information about specific body parts, burns, drains and tubes, obstetrics, and neuro, mental, and cardio conditions. You can add as many Assessments as needed and edit any that were already saved to the PCR.
We will look at the process of adding Additional Assessments to a PCR, and will go through each section available on the Additional Assessments page.
Watch the video below for an in-depth look at the Additional Assessments page.
Notes for creating and editing Assessments:
-
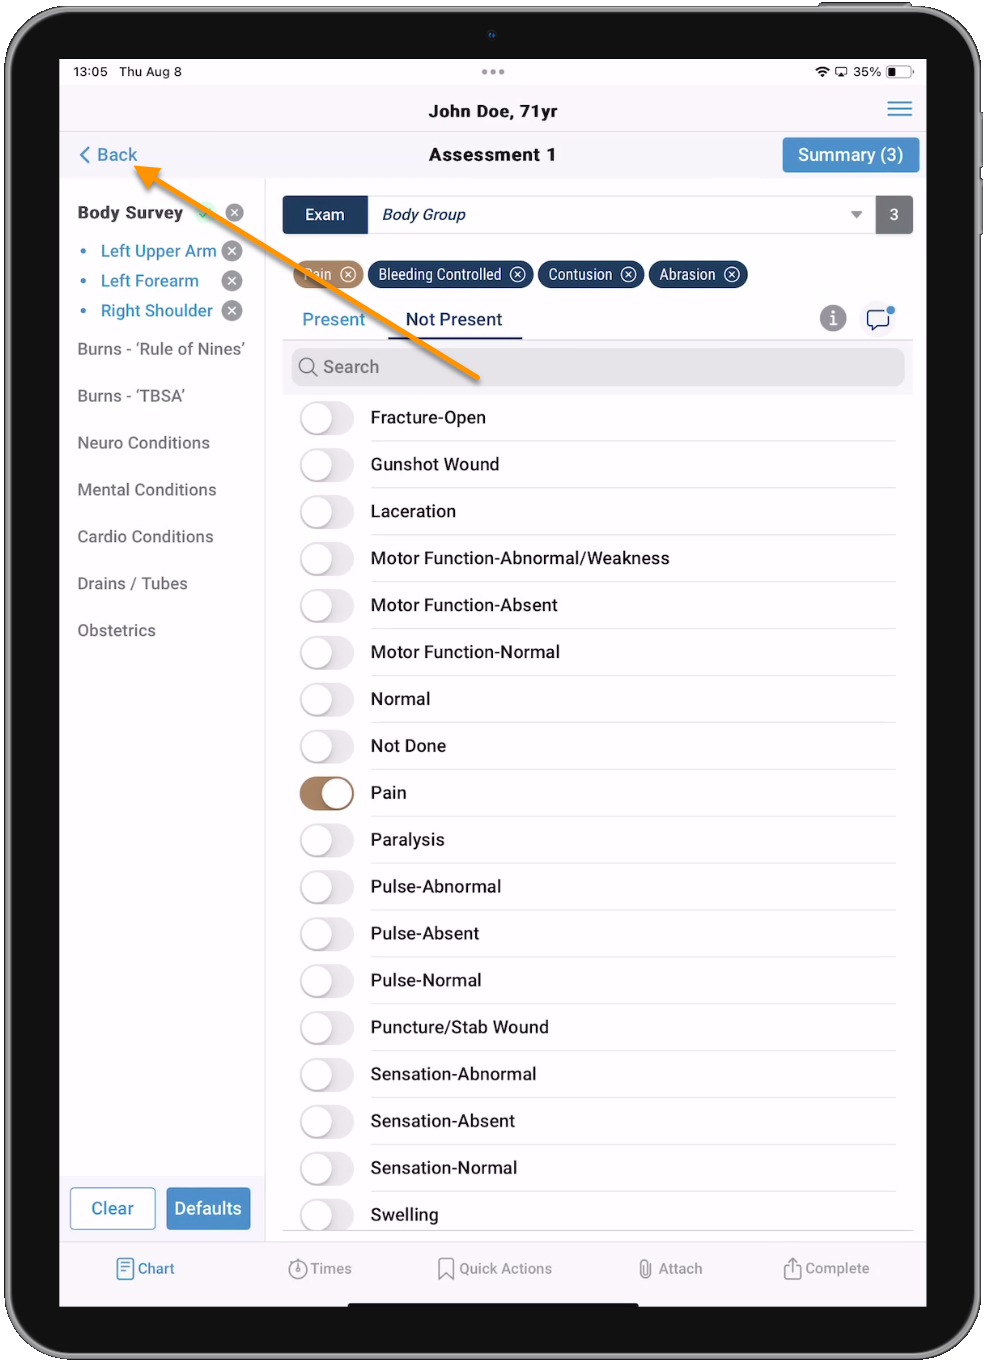
Once you begin adding an Assessment you will see a Back button in the top left. The Back button functions like it does in a web browser, bringing you to the last screen you were on. Tapping it multiple times will continue bringing you to the previous screen until you are fully out of Additional Assessments and back to the Patient Care Report page.
-
Tap the chat
 icon to add comments to the examination. When comments have been saved to the examination, the chat icon will show a notification
  .
. -
If your Command Facility has Assessment Defaults configured, you can tap Default in the lower left to add all those default values to the Assessment. Using this option will overwrite any previously documented values with your system defaults.
-
Tap Summary at any time to see a full summary of the current Assessment. The number in parenthesis is the number examinations documented for the current Assessment. Tap Delete to delete the entire Assessment. Tap Edit on the Summary screen to choose any Assessment section to modify. Once in edit mode, tap the stylus icon
 for a specific section to edit, or tap the radio button and then tap Delete to remove the section from the Assessment.
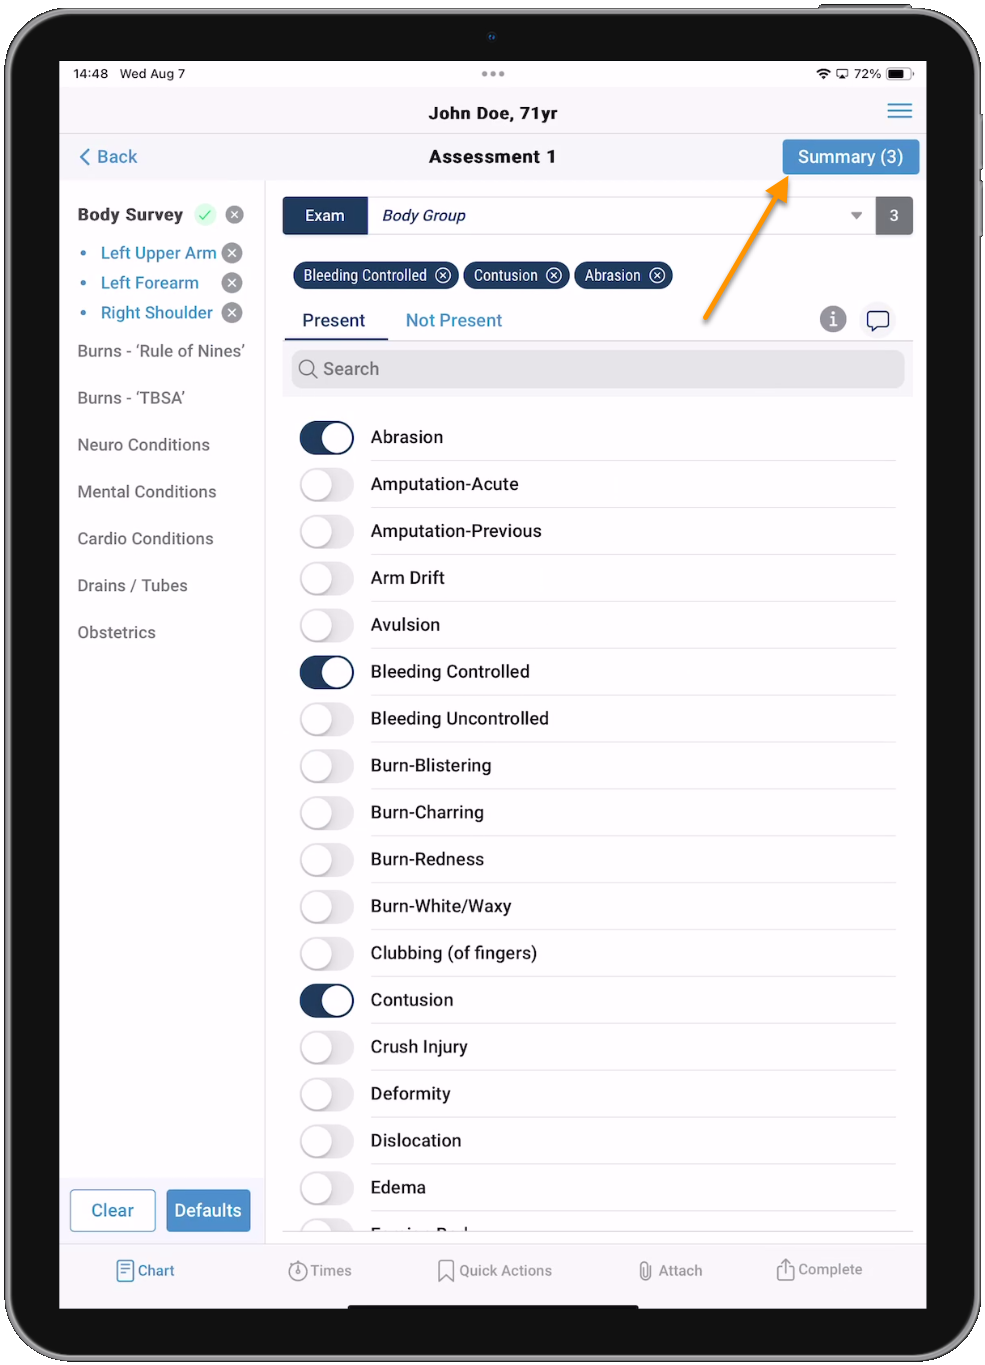


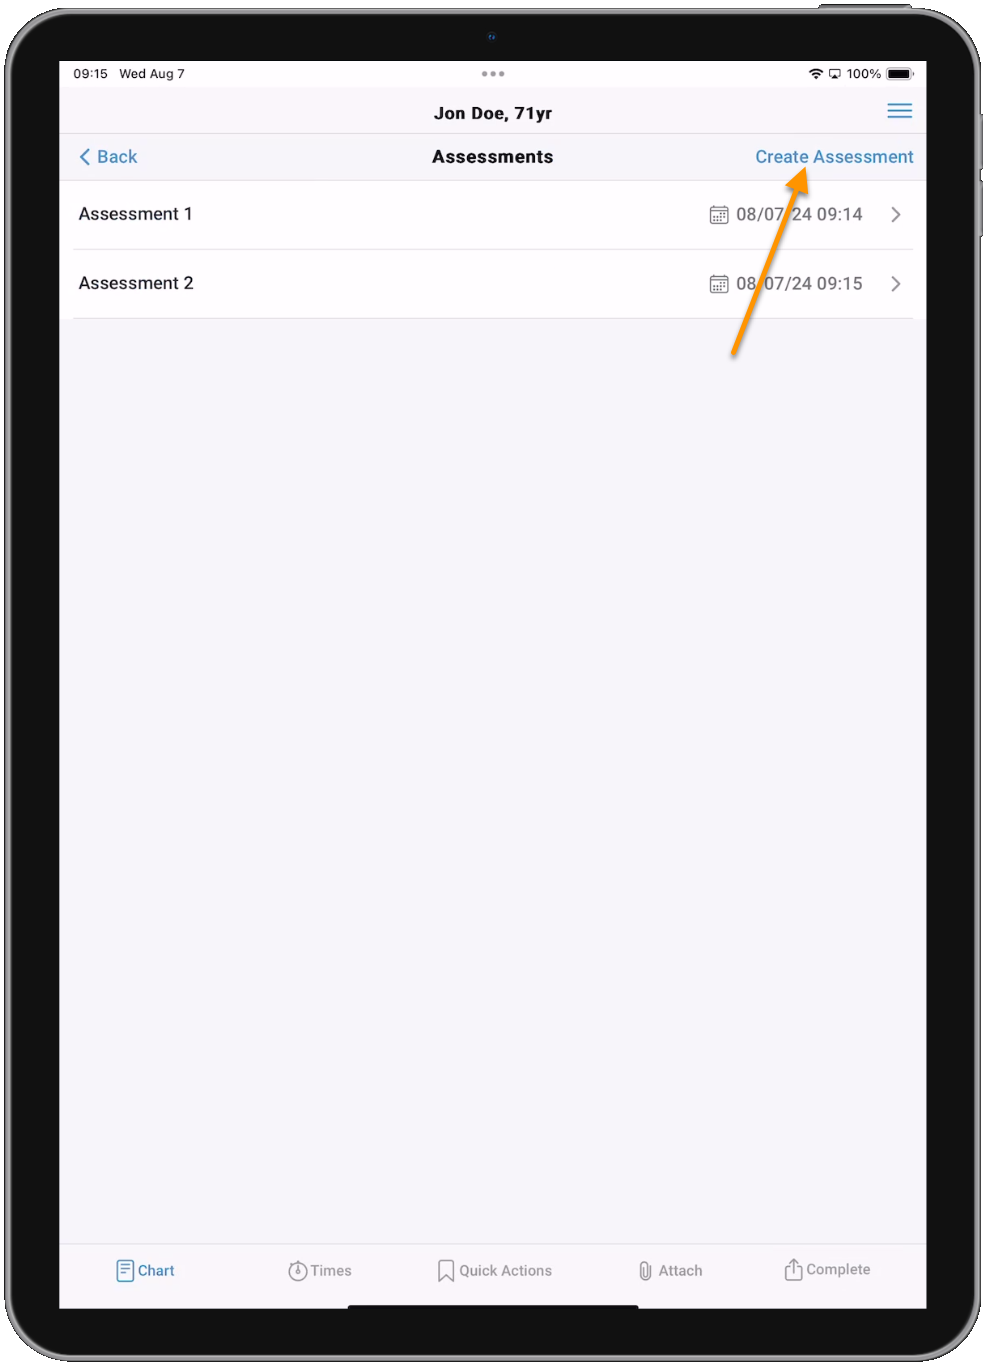
Create Assessments
On the Additional Assessments page, tap Create Assessment to begin documenting a new Assessment. Any Assessments already saved to the PCR will be listed numerically in the order they were added.
If there are any saved Assessments, a prompt will display asking if you want to start your next Assessment from all the examinations made in the last Assessment saved. If you select 'Yes', your new Assessment will be populated with all the information documented in the last Assessment added to the PCR (the Assessment with the highest numeric value).

Assessments consist of several sections. You can complete each section as needed and in any order.
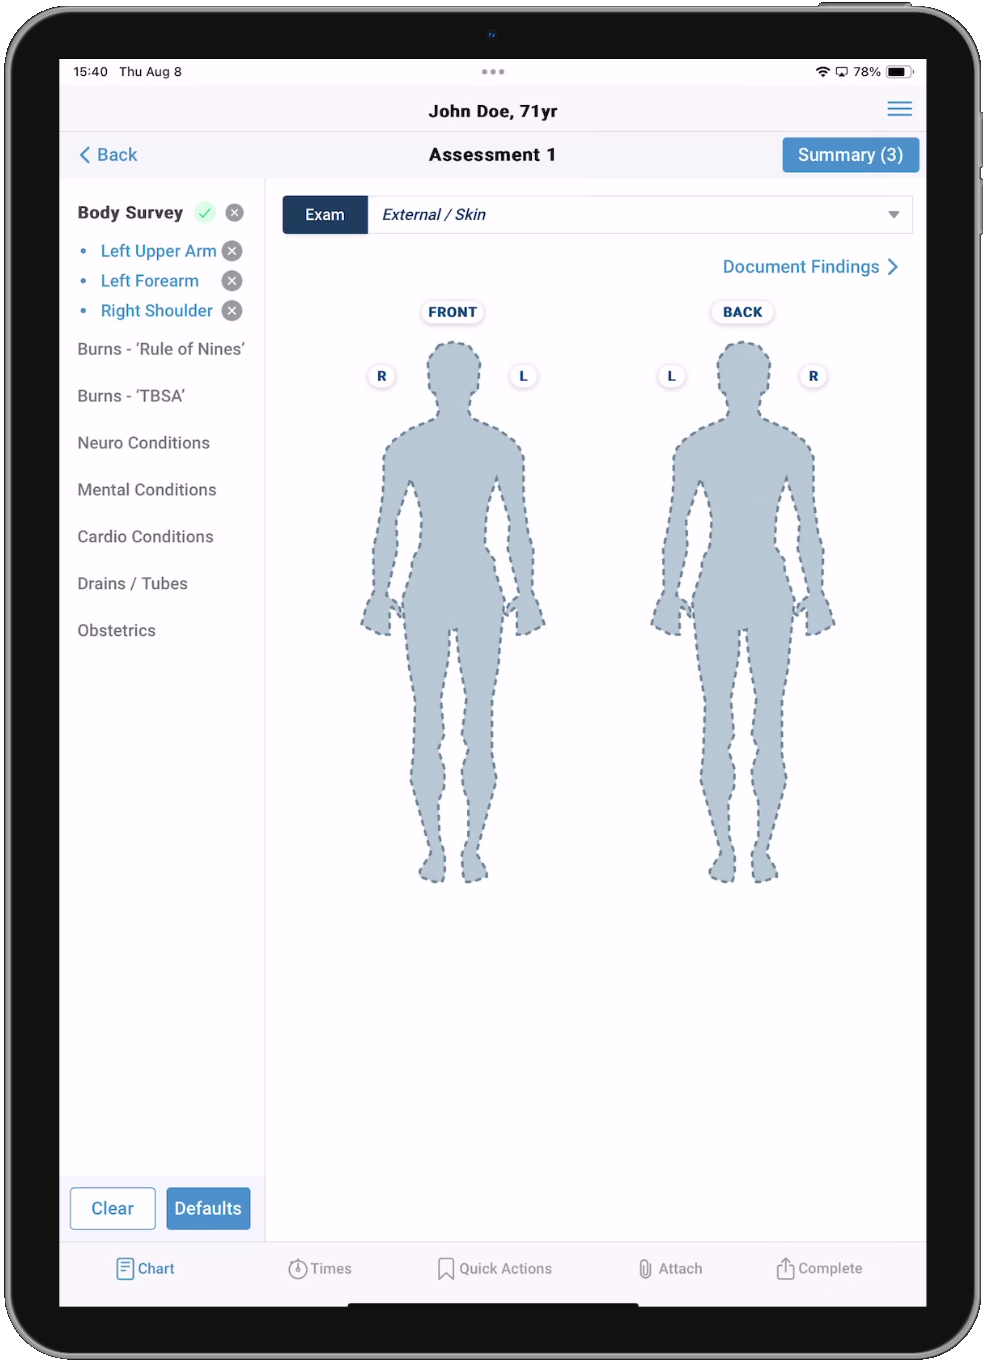
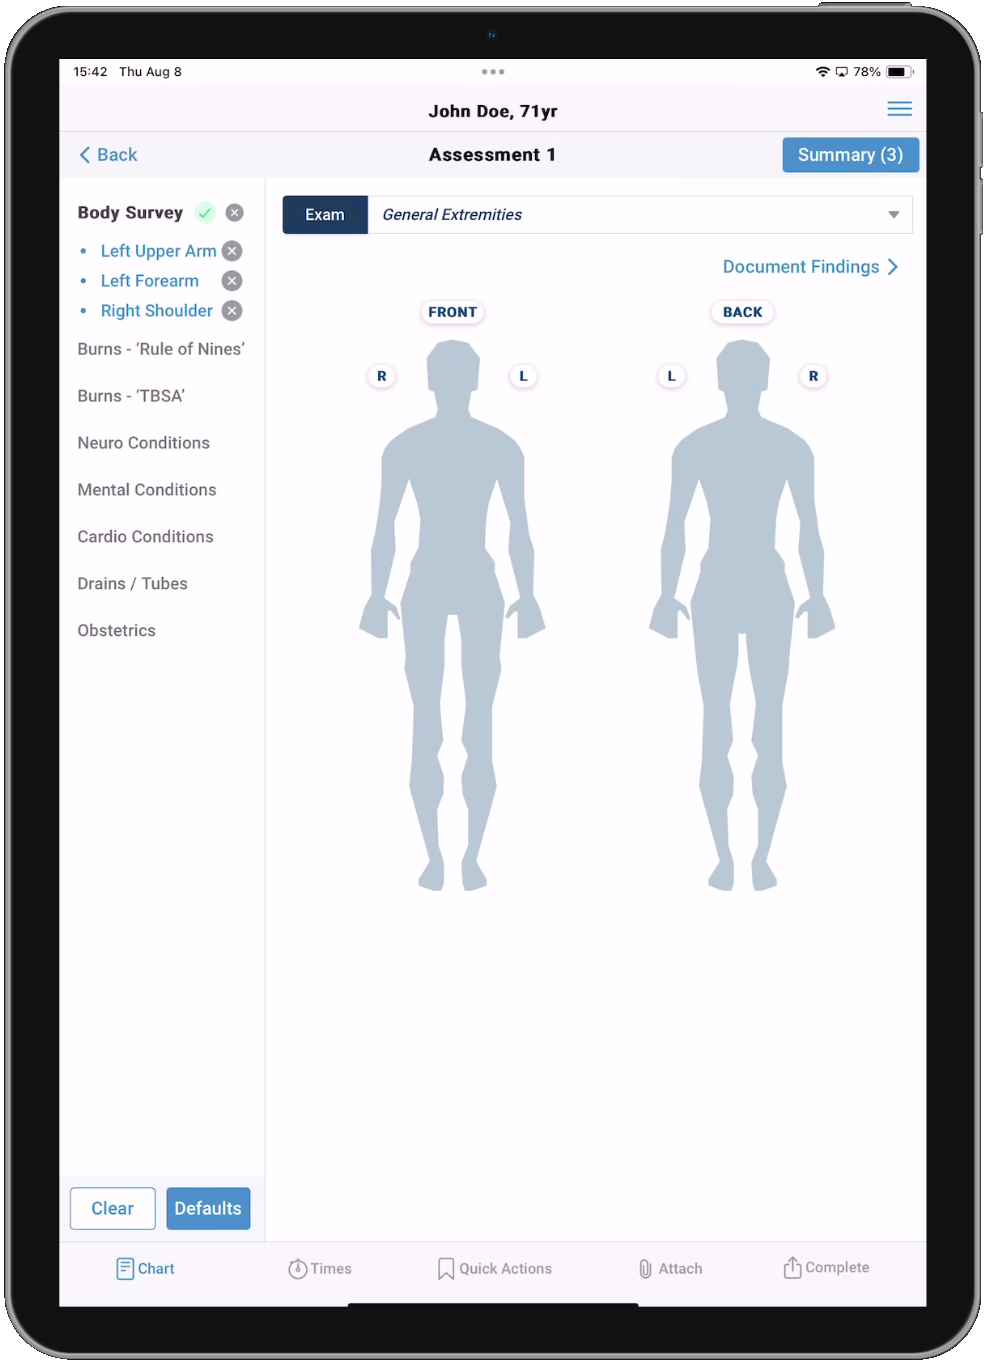
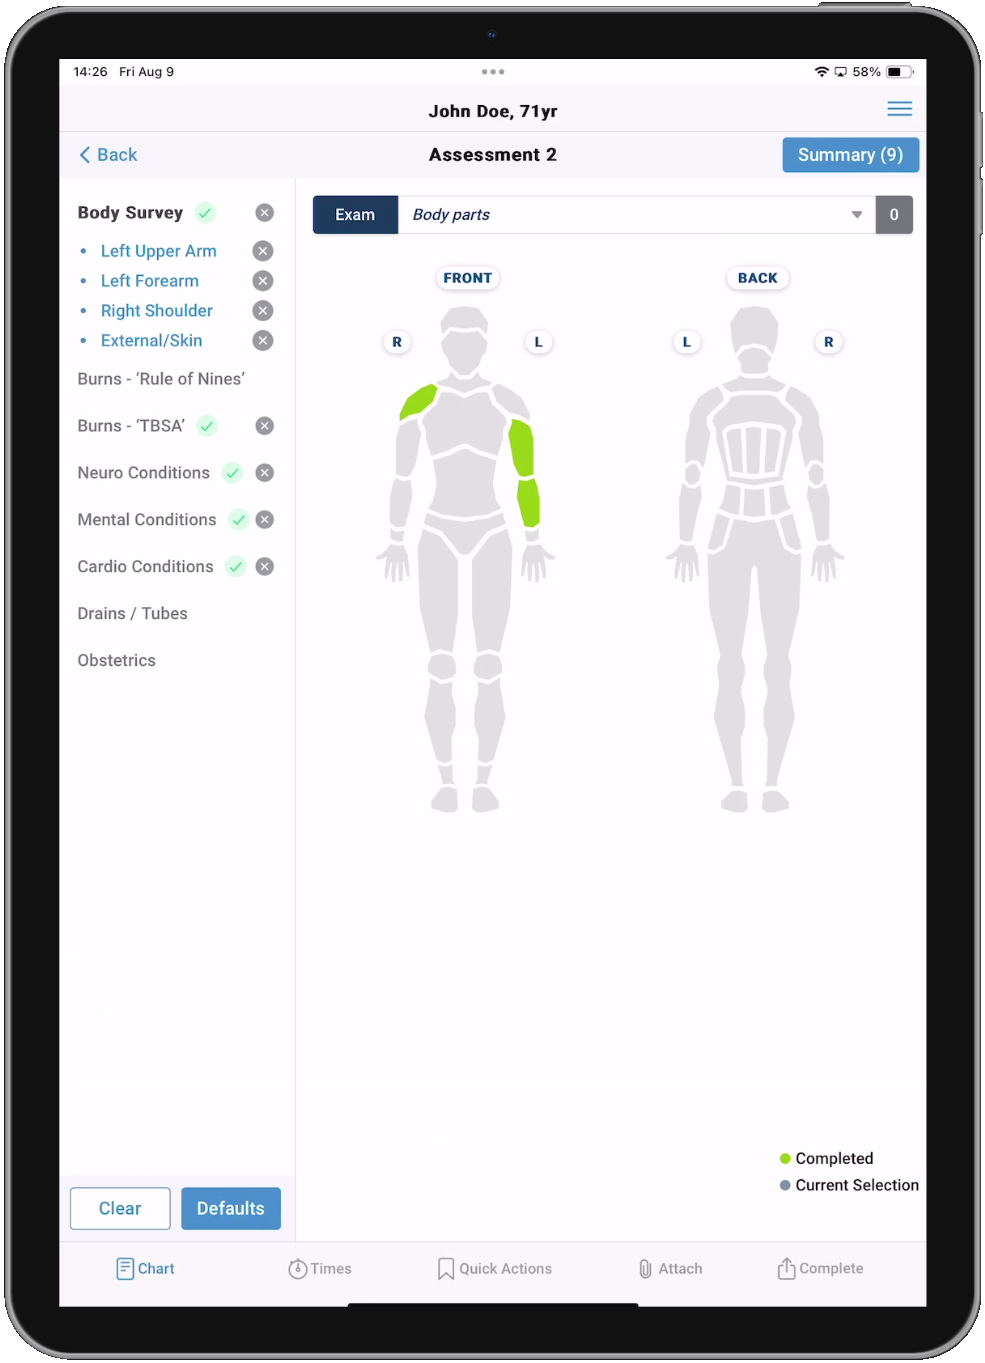
The first section is the Body Survey.
![]()
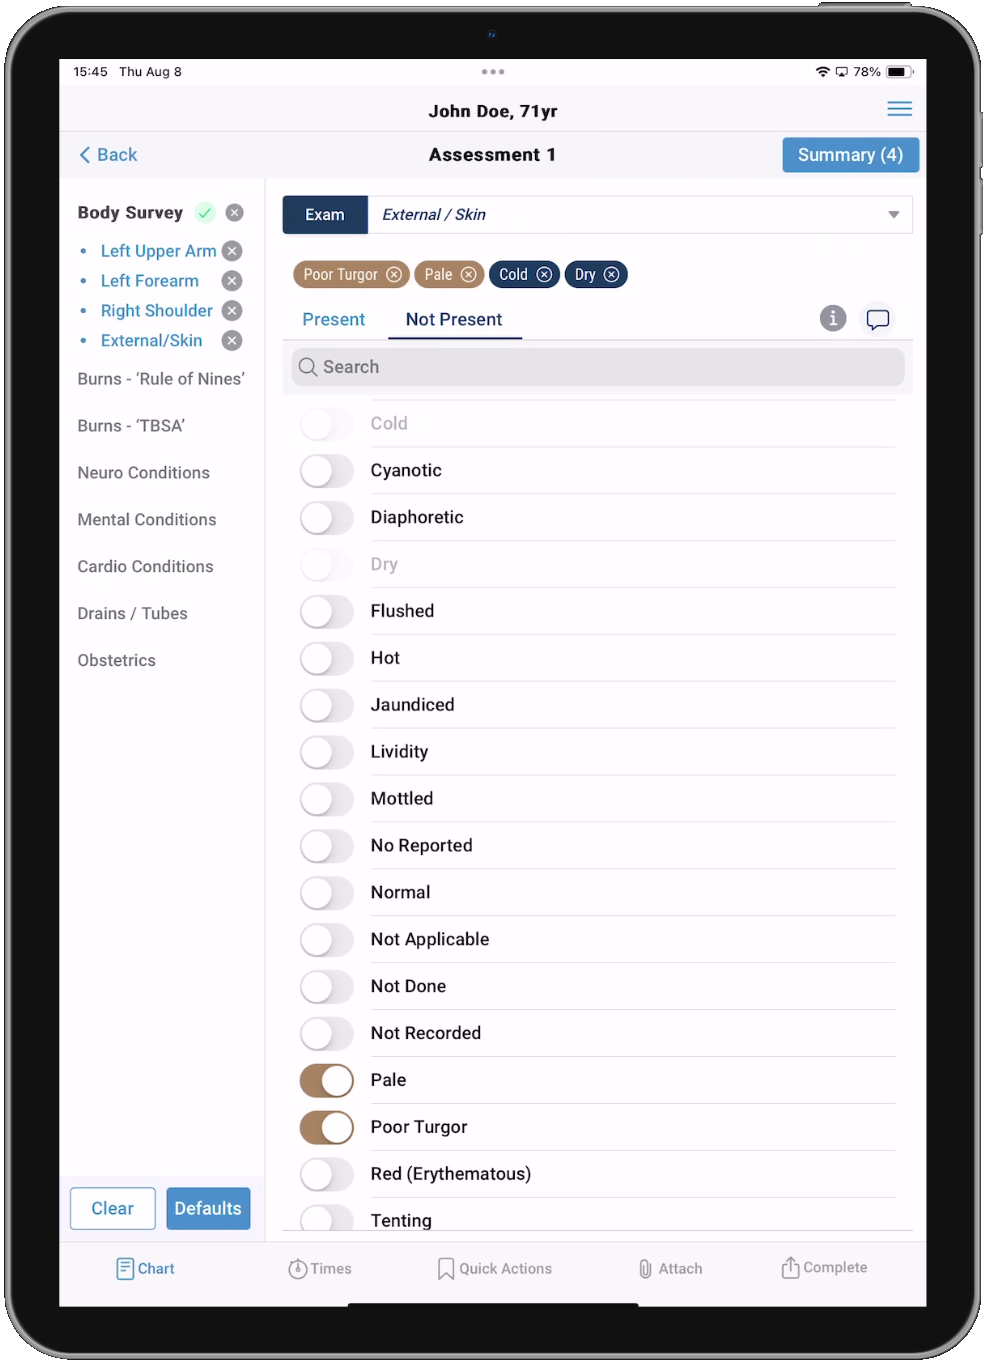
Select the Exam type from the top drop-down menu. You can choose between 'Body parts', 'External / Skin', and 'General Extremities'.
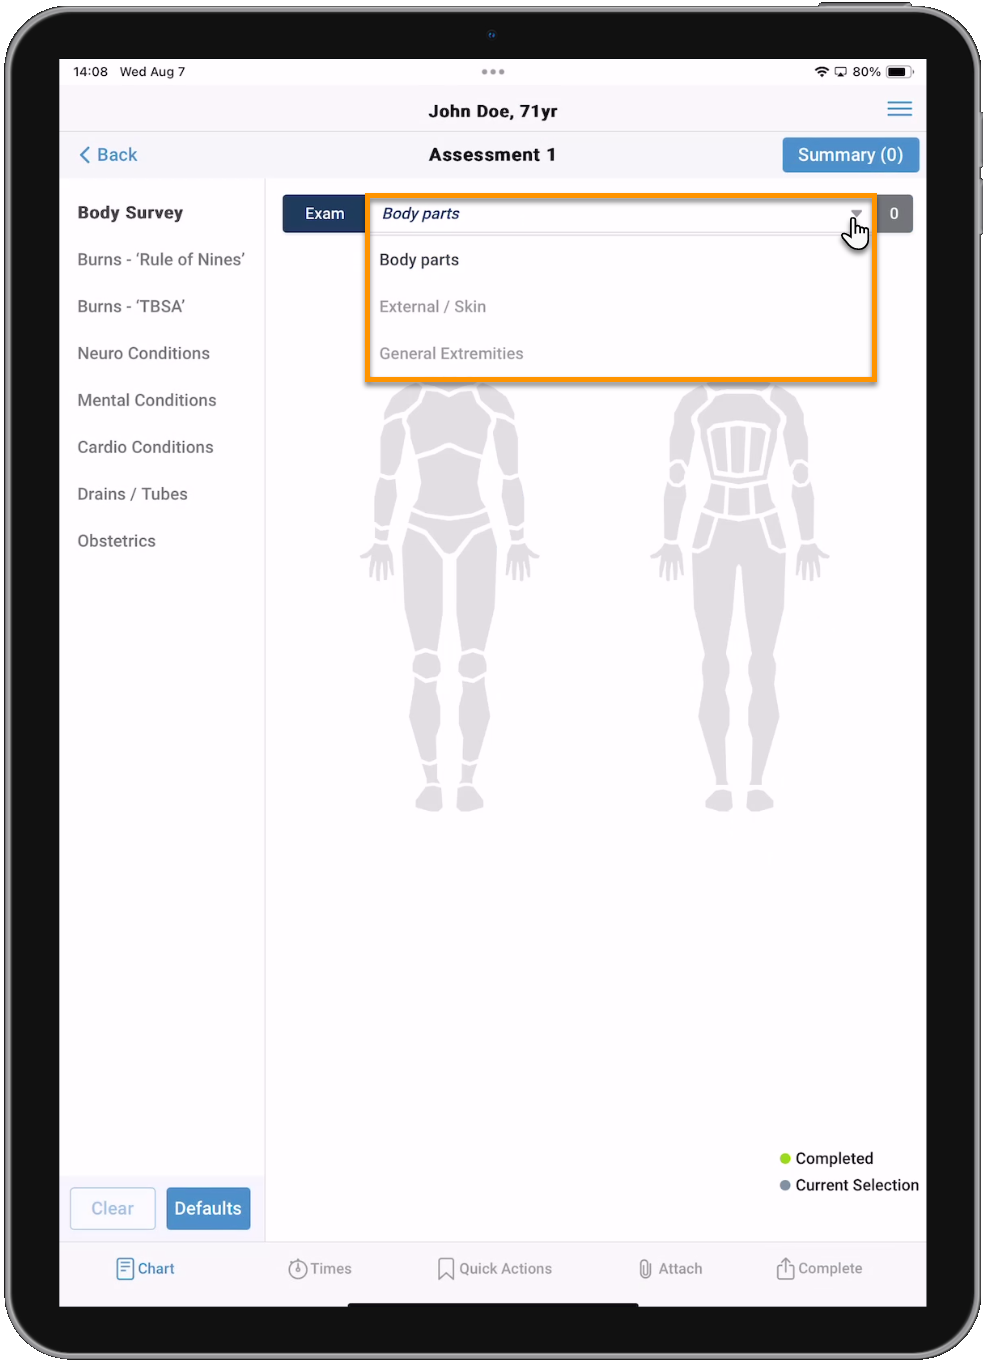
The following notes apply to all three Body Survey Exam types:
-
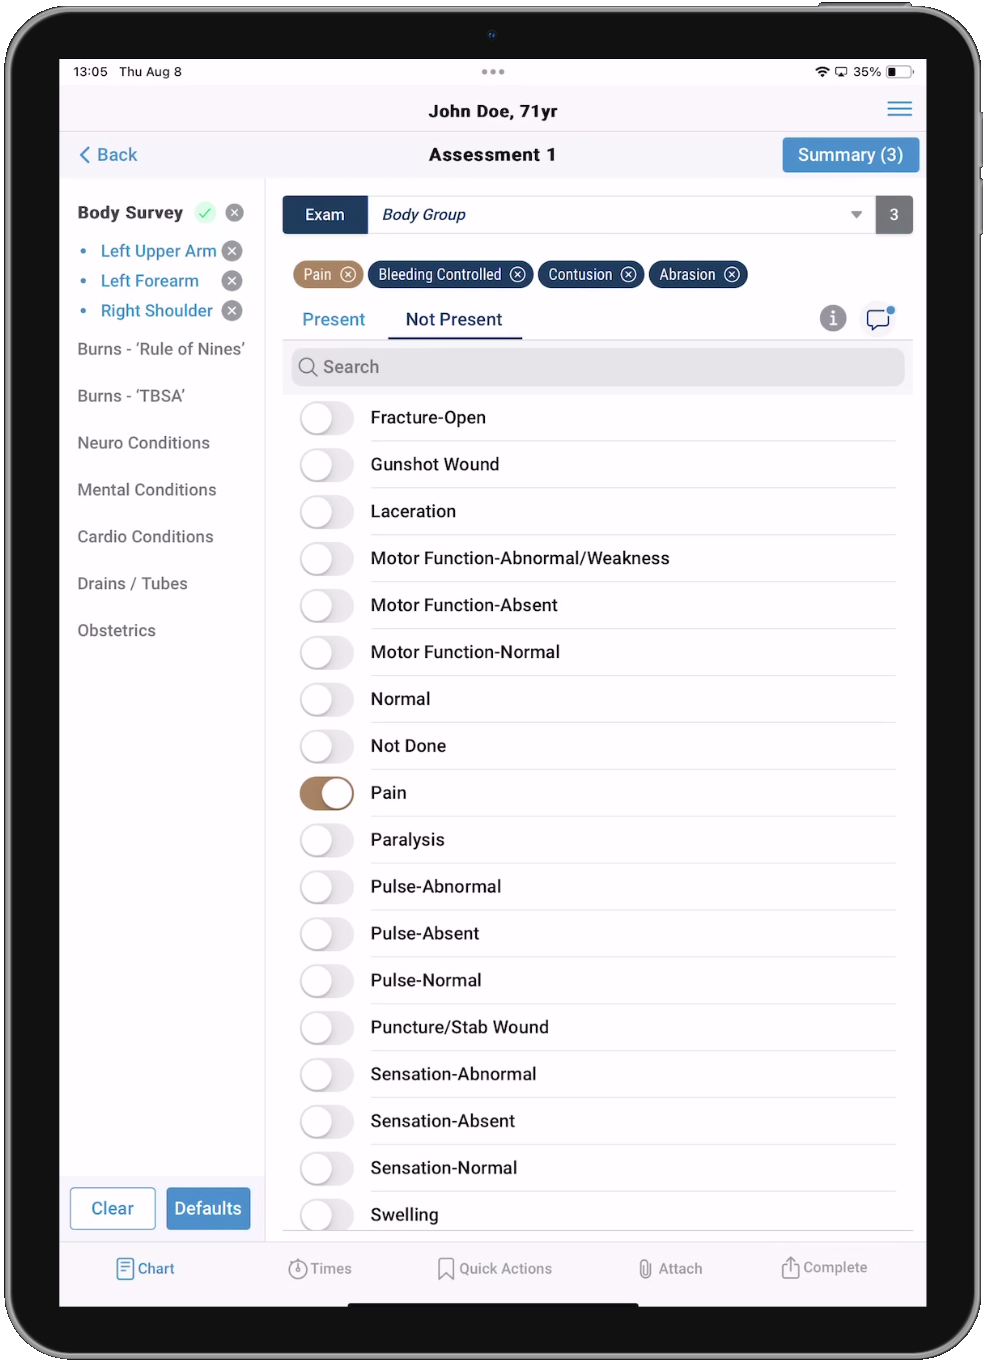
Present values are conditions that are present in the examination.
-
Not Present values are conditions that are pertinent to the injury but are not present.
-
You cannot choose the same value for both Present and Not Present. Selections made for Present will be grayed out and not selectable for Not Present, and vice versa.
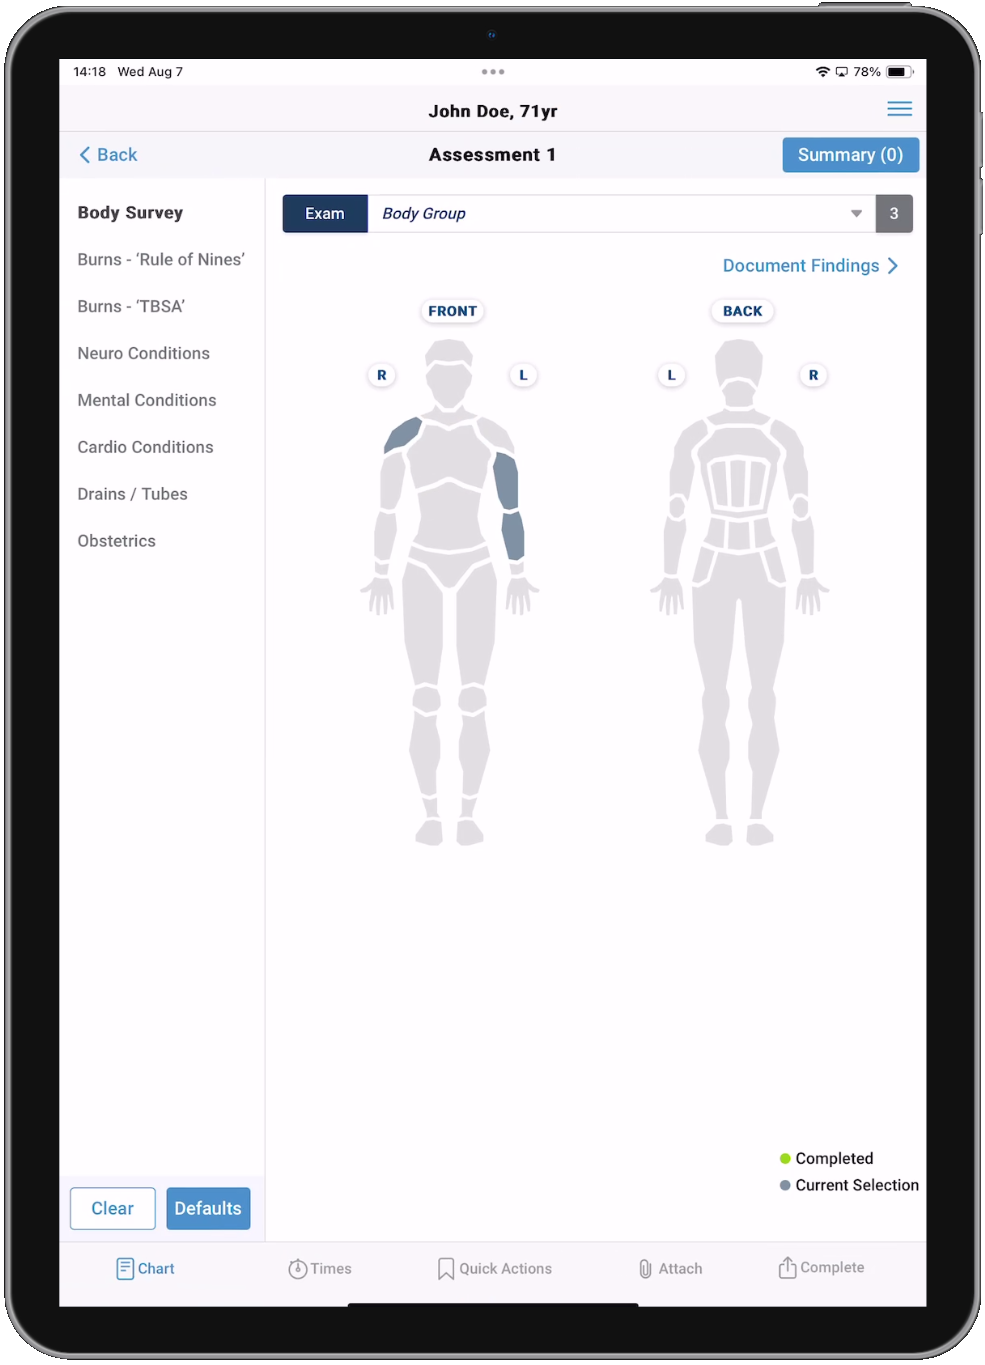
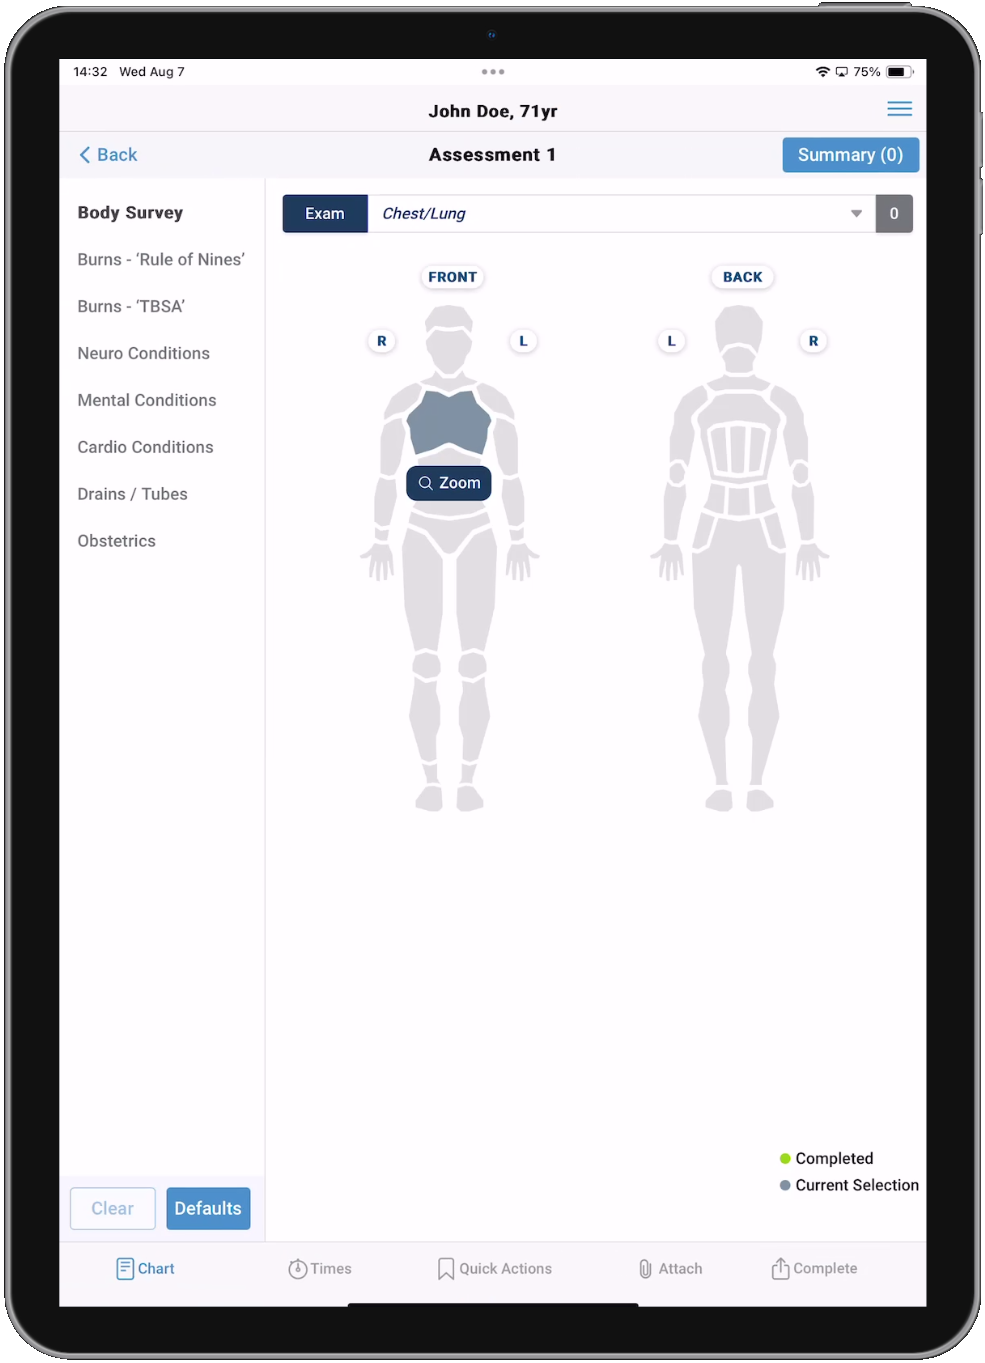
Body parts
-
With the 'Body parts' Exam selected, you can tap on individual body parts on the front and/or back of the Body Survey images to select them. Body parts that have been selected but not yet completed (findings have not been documented) will be highlighted in slate blue. Body parts that have been completed (findings have been documented) will be highlighted in green. Once your selections are made, tap Document Findings to proceed.
Notes:
-
If a body part has more detailed selections, a Zoom button will display that you can tap to zoom in and select the specific areas of that body part.
-
If you select multiple body parts, the number to the right of the Exam field will track how many parts are selected.

-
-
The Present and Not Present multi-select lists will display. Selected values will be added as a chip above the Present and Not Present tabs. Present selections are blue and Not Present are gold. If the list is longer than the screen, you can tap and hold to scroll left and right to see all the documented selections.
Important! If you select multiple body parts, the list will only display values that are common to all selected body parts. If you do not see the value you need, try selecting the body parts one at a time to see all the values that apply to them.

-
With your findings documented, you can move on to another Assessment section or tap Back until you are back to the main Assessments page or back to the Patient Care Report page.
External / Skin and General Extremities
-
The 'External / Skin' and 'General Extremities' Exams function a little differently than 'Body parts'. Since these Exams apply to the entire 'External / Skin' area and 'General Extremities', you won't select specific parts of the body and will tap Document Findings to finish your examination.
-
The Present and Not Present multi-select lists will display. Selected values will be added as a chip above the Present and Not Present tabs. Present selections are blue and Not Present are gold. If the list is longer than the screen, you can tap and hold to scroll left and right to see all the documented selections.


-
With your findings documented, you can move on to another Assessment tab or tap Back until you are back to the main Assessments page or back to the Patient Care Report page.
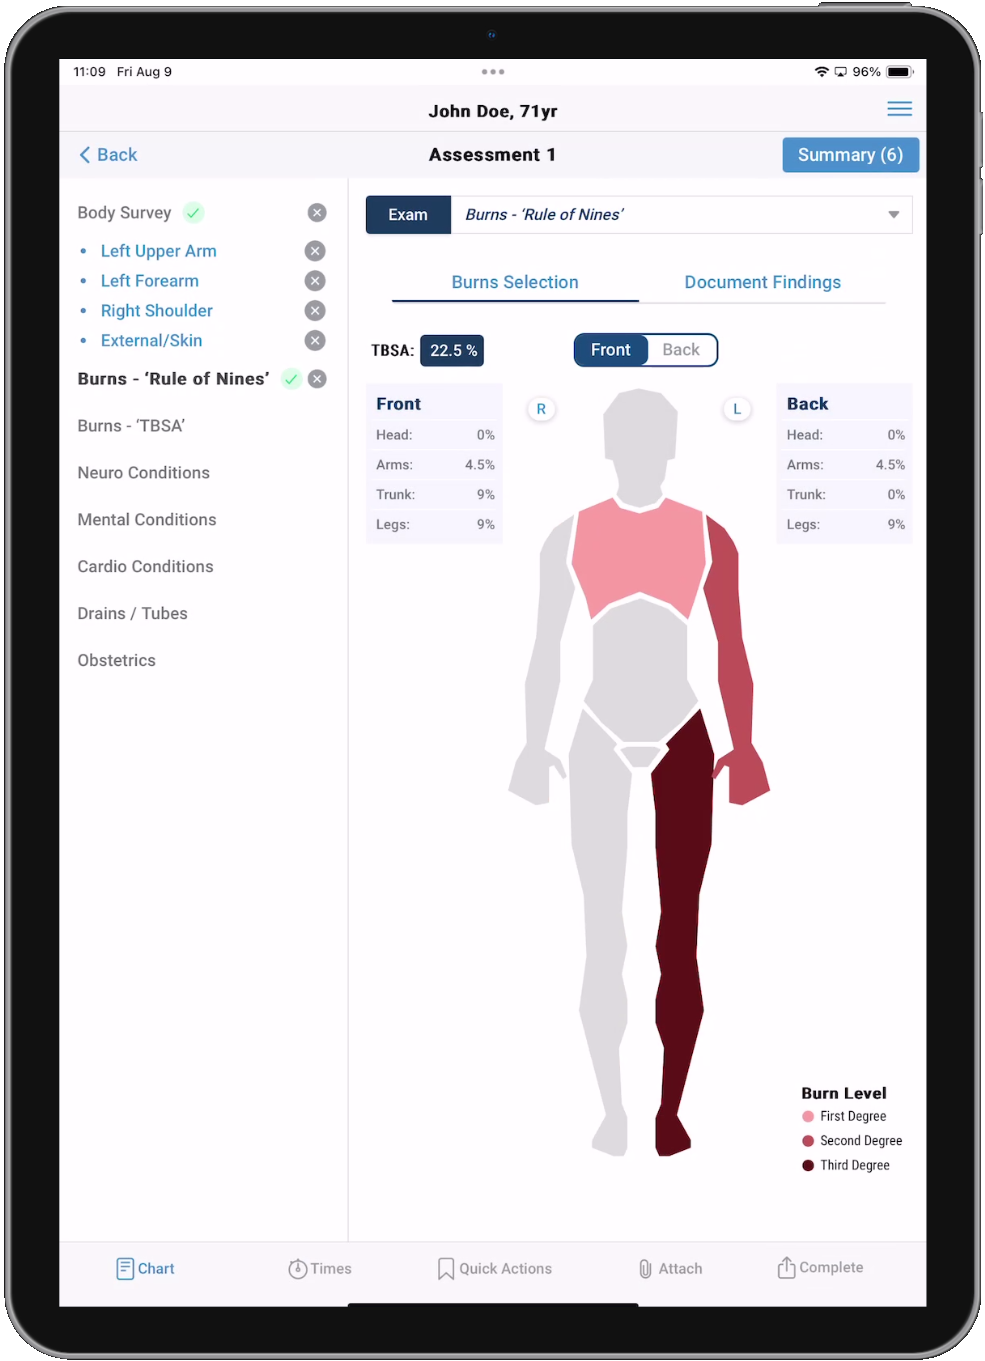
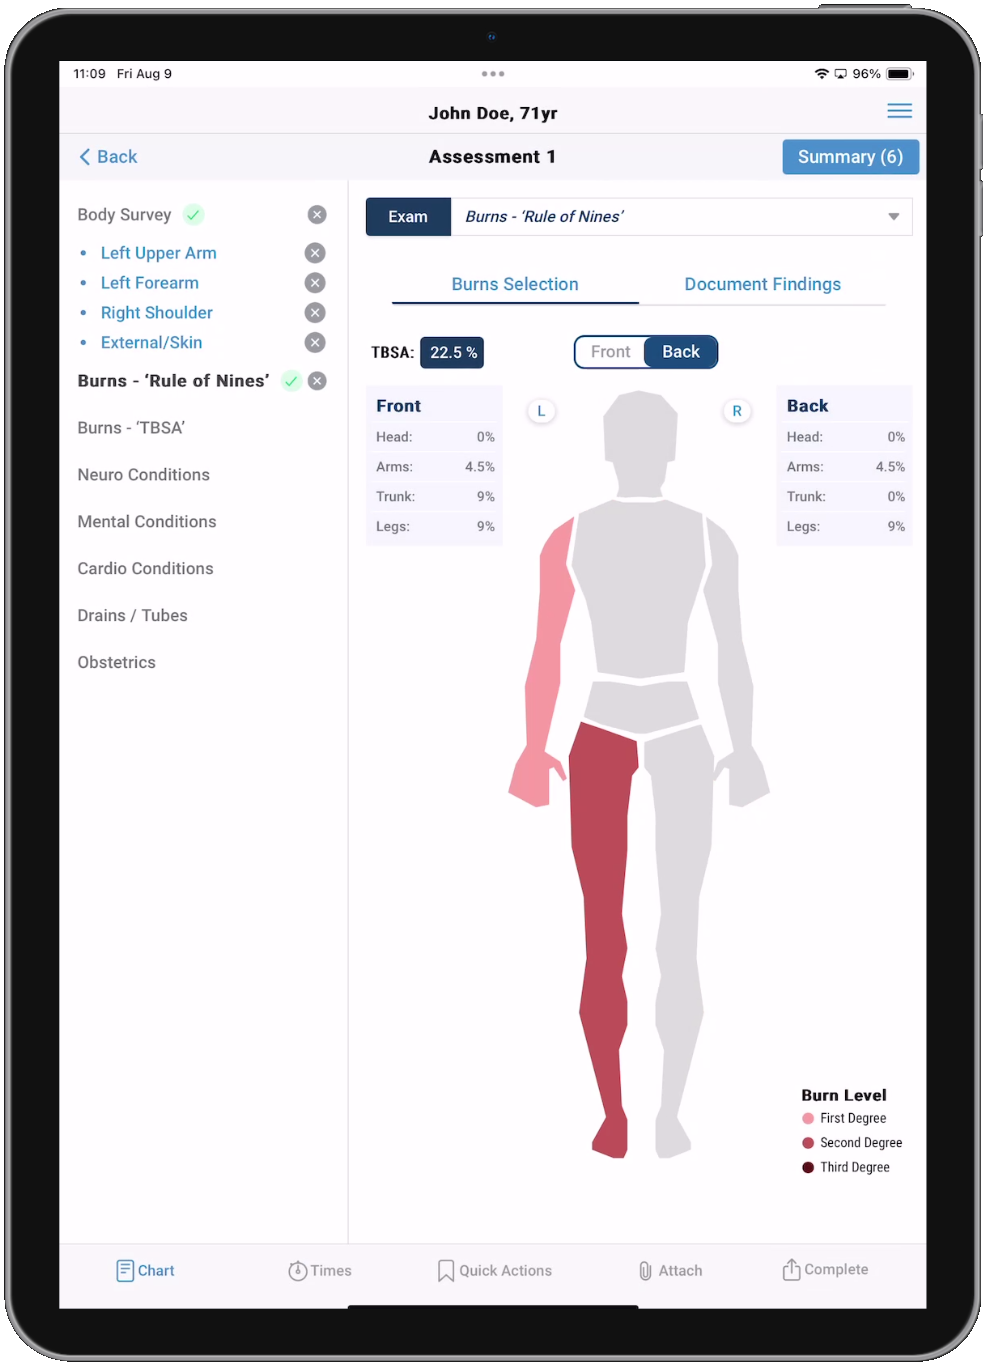
The second section is Burns - 'Rule of Nines'.
When you go to the Burns - 'Rule of Nines' section, a message will display stating that "If you wish to proceed, all burn info recorded using the other method will be lost. Do you wish to proceed?" If you tap Ok, any burn information already documented in Burns - 'TBSA' will be removed. The only data that will carry over are the Burn Type, Singed Nasal Hair, Carbon in mouth, Poor ventilation, and CO Level.
![]()
-
In the Burns - 'Rule of Nines' section you can document first, second, and third degree burns by tapping on an area of the body, once for first degree, twice for second degree, or three times for third degree. Tapping a fourth time will clear any burns from that body area. Use the Front/Back toggle to switch between the front and back of the body.
As you add burns, the percentages for each body area will be automatically calculated in real-time.
-
Once you have added all the burns to the body, tap Document Findings to proceed. You will see the calculated Total Body Surface Area and if applicable, can document Burn Type, Singed Nasal Hair, Carbon in mouth, Poor ventilation, and CO Level.
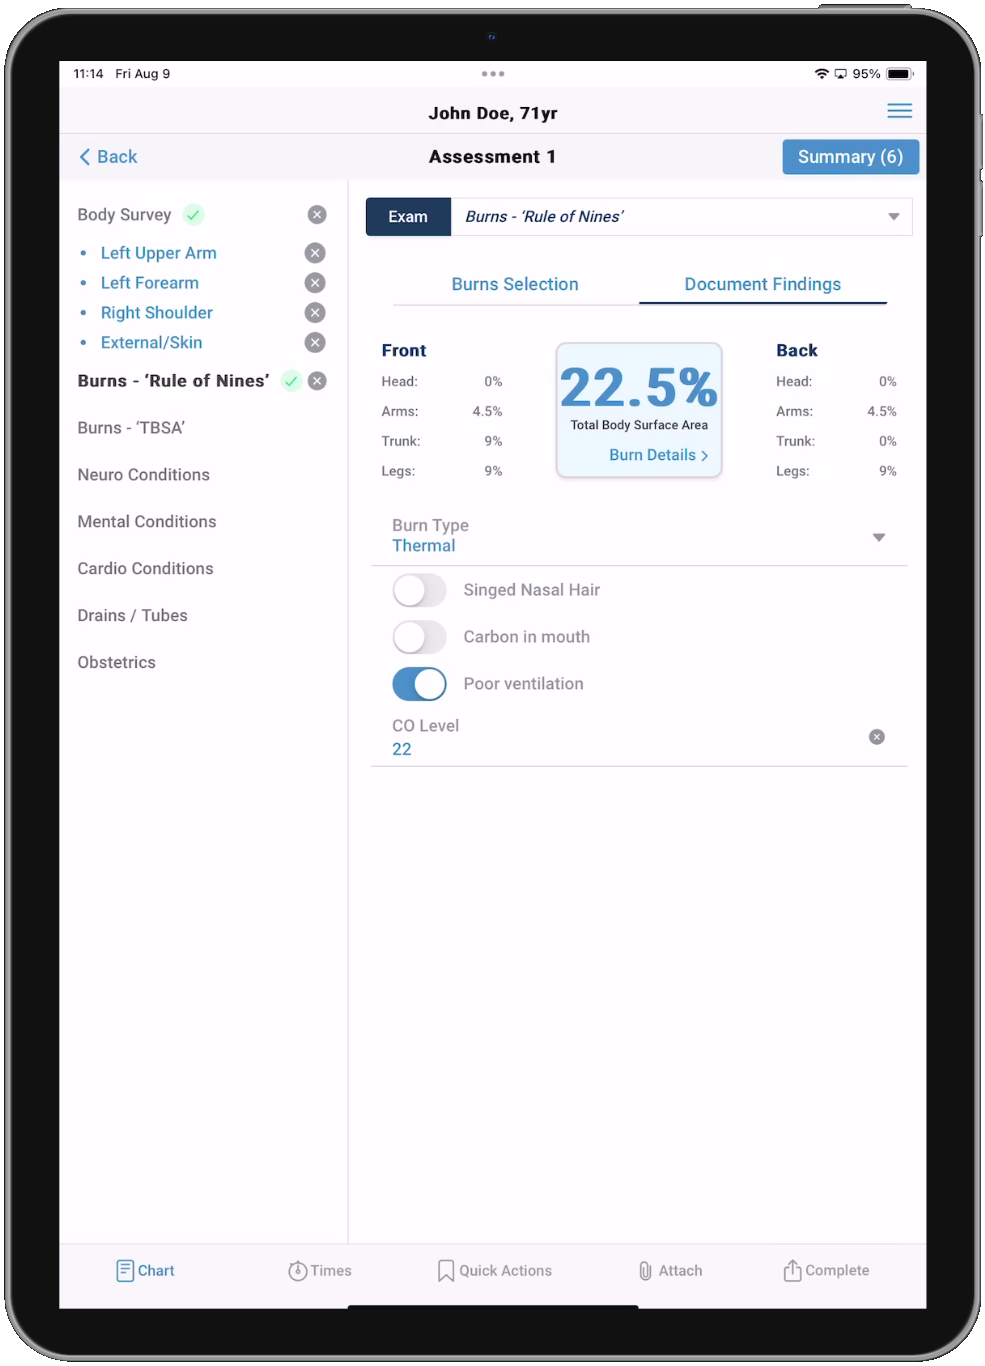
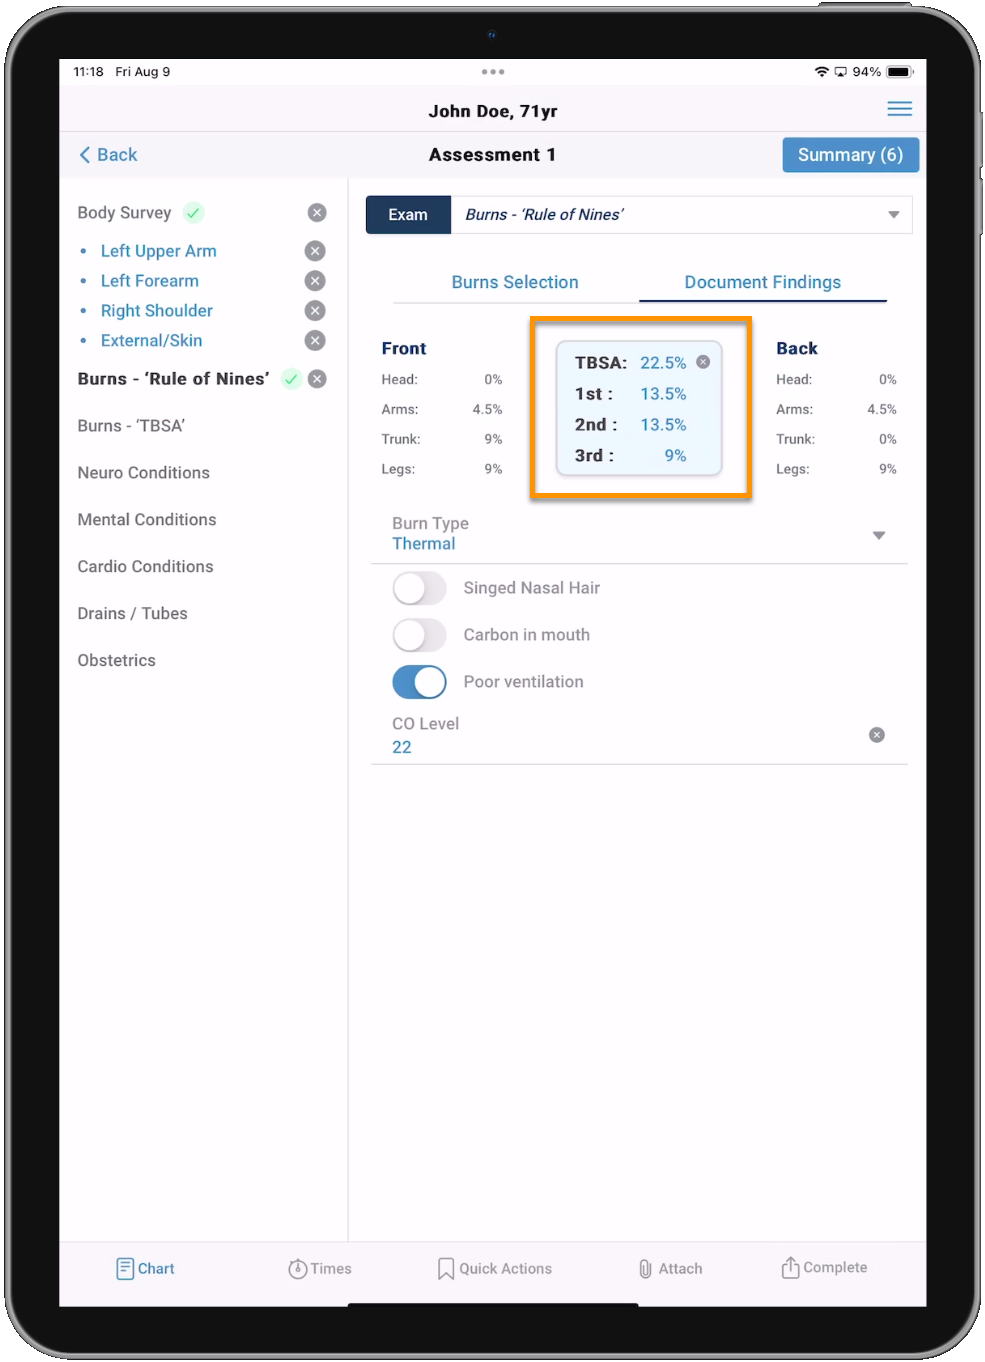
In the Total Body Surface Area calculation window, tap Burn Details to see the 1st, 2nd, and 3rd degree calculations.
-
With your findings documented, you can move on to another Assessment section or tap Back until you are back to the main Assessments page or back to the Patient Care Report page.
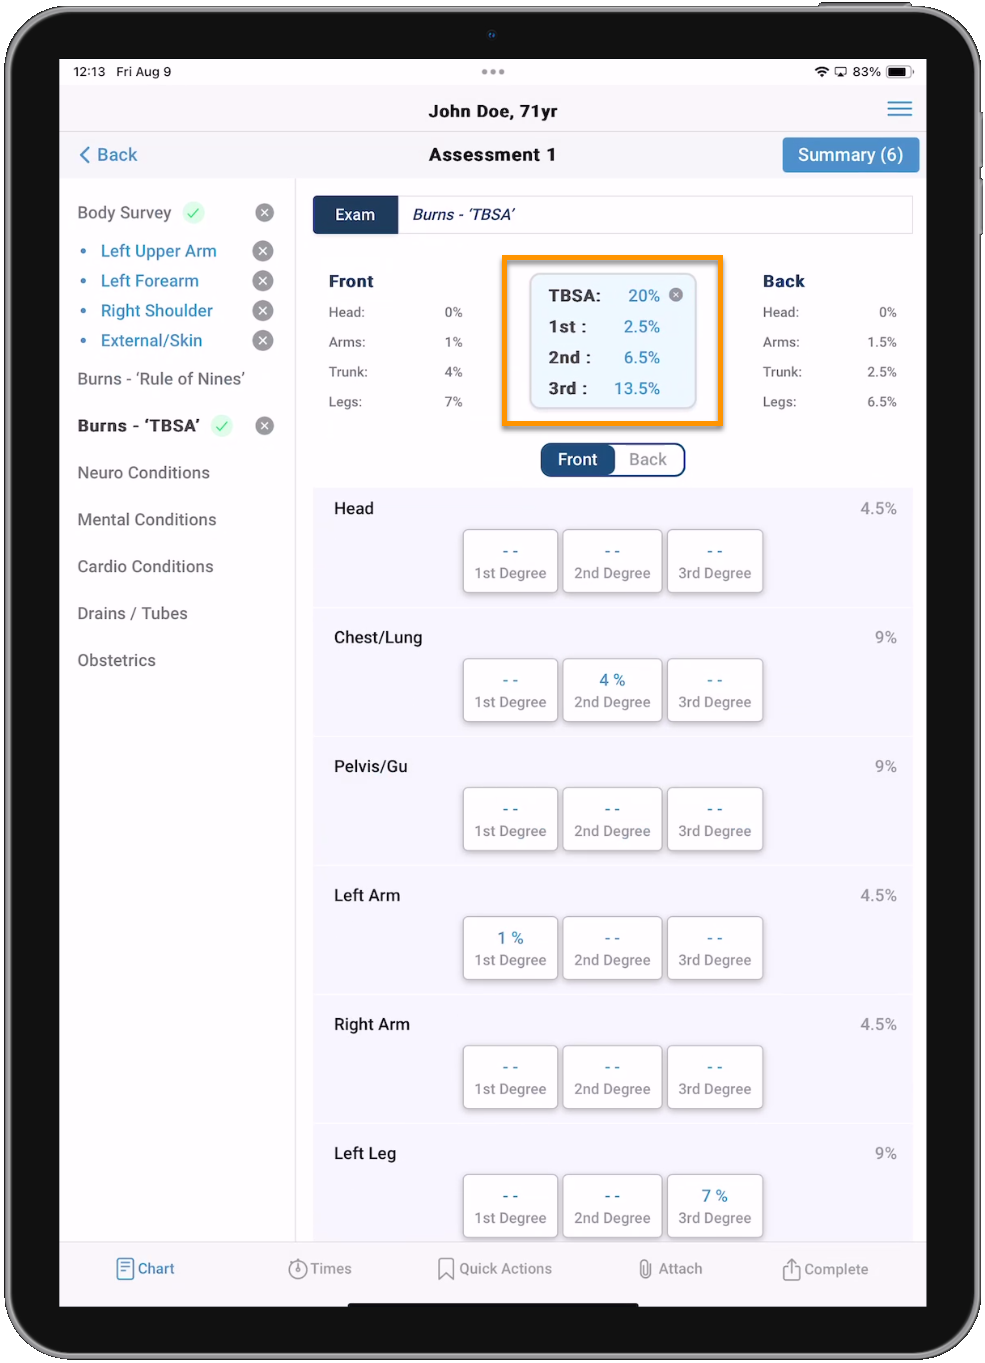
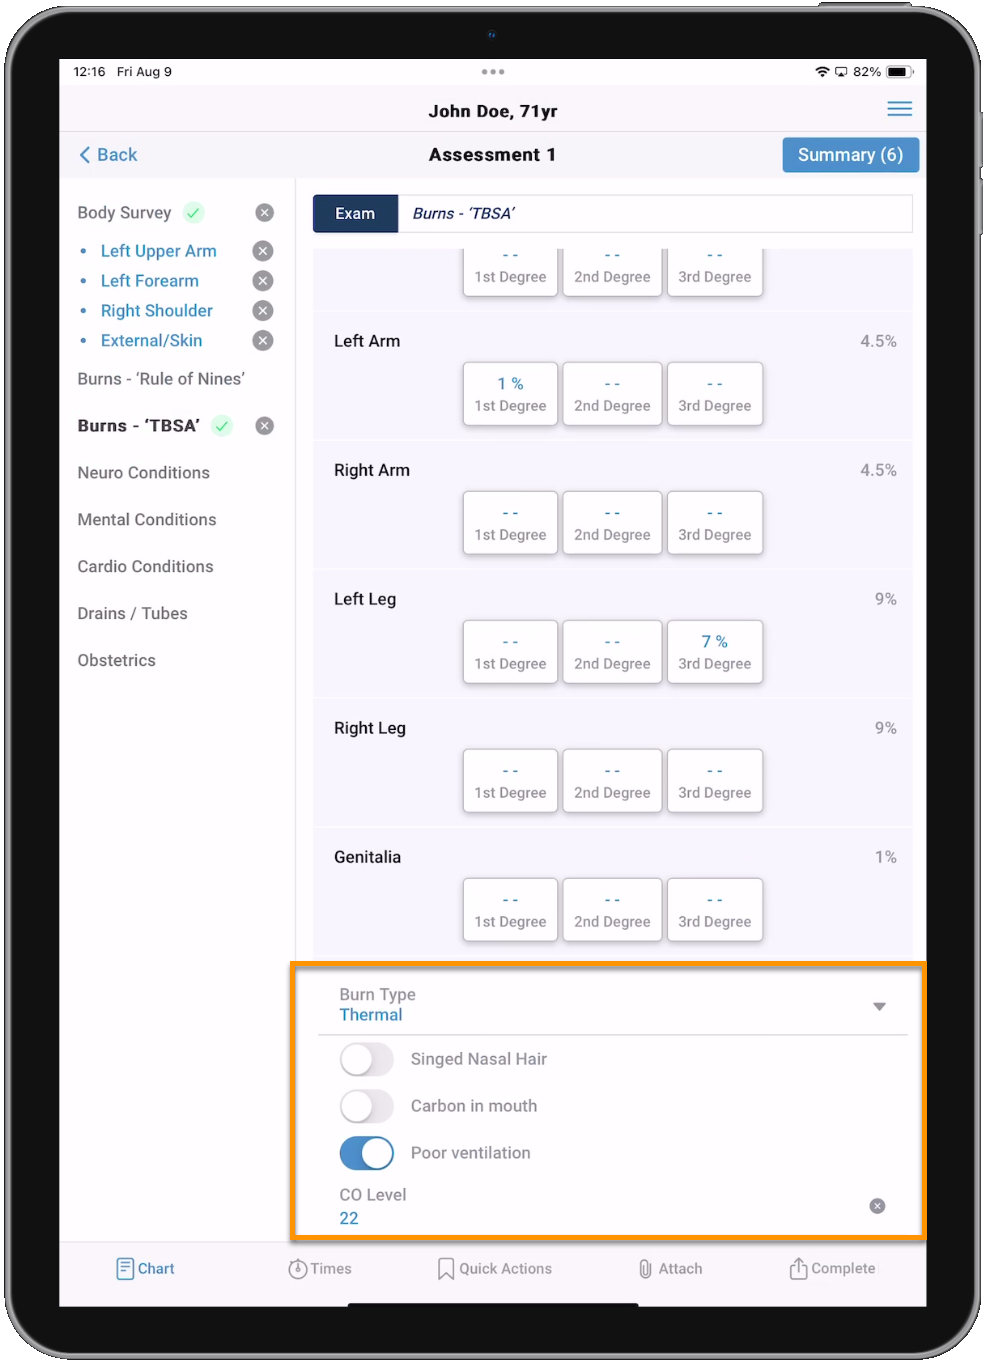
The third section is Burns - 'TBSA'.
When you go to the Burns - 'TBSA' section, a message will display stating that "If you wish to proceed, all burn info recorded using the other method will be lost. Do you wish to proceed?" If you tap Ok, any burn information already documented in Burns - 'Rule of Nines' will be removed. The only data that will carry over are the Burn Type, Singed Nasal Hair, Carbon in mouth, Poor ventilation, and CO Level.
![]()
-
In the Burns - 'TBSA' section you can document first, second, and third degree burns by tapping the 1st Degree, 2nd Degree, and 3rd Degree buttons for the applicable body part or area. Use the slider that displays to adjust the specific percentage of the burn up to the maximum allowed for that body part or area. Use the Front/Back toggle to switch between the front and back of the body.
As you add burns, the percentages for each body part or area, and the Total Body Surface Area will be automatically calculated in real-time.

In the Total Body Surface Area calculation window, tap Burn Details to see the 1st, 2nd, and 3rd degree calculations.
-
Scroll down to the bottom to document Burn Type, Singed Nasal Hair, Carbon in mouth, Poor ventilation, and CO Level.
-
With your findings documented, you can move on to another Assessment section or tap Back until you are back to the main Assessments page or back to the Patient Care Report page.
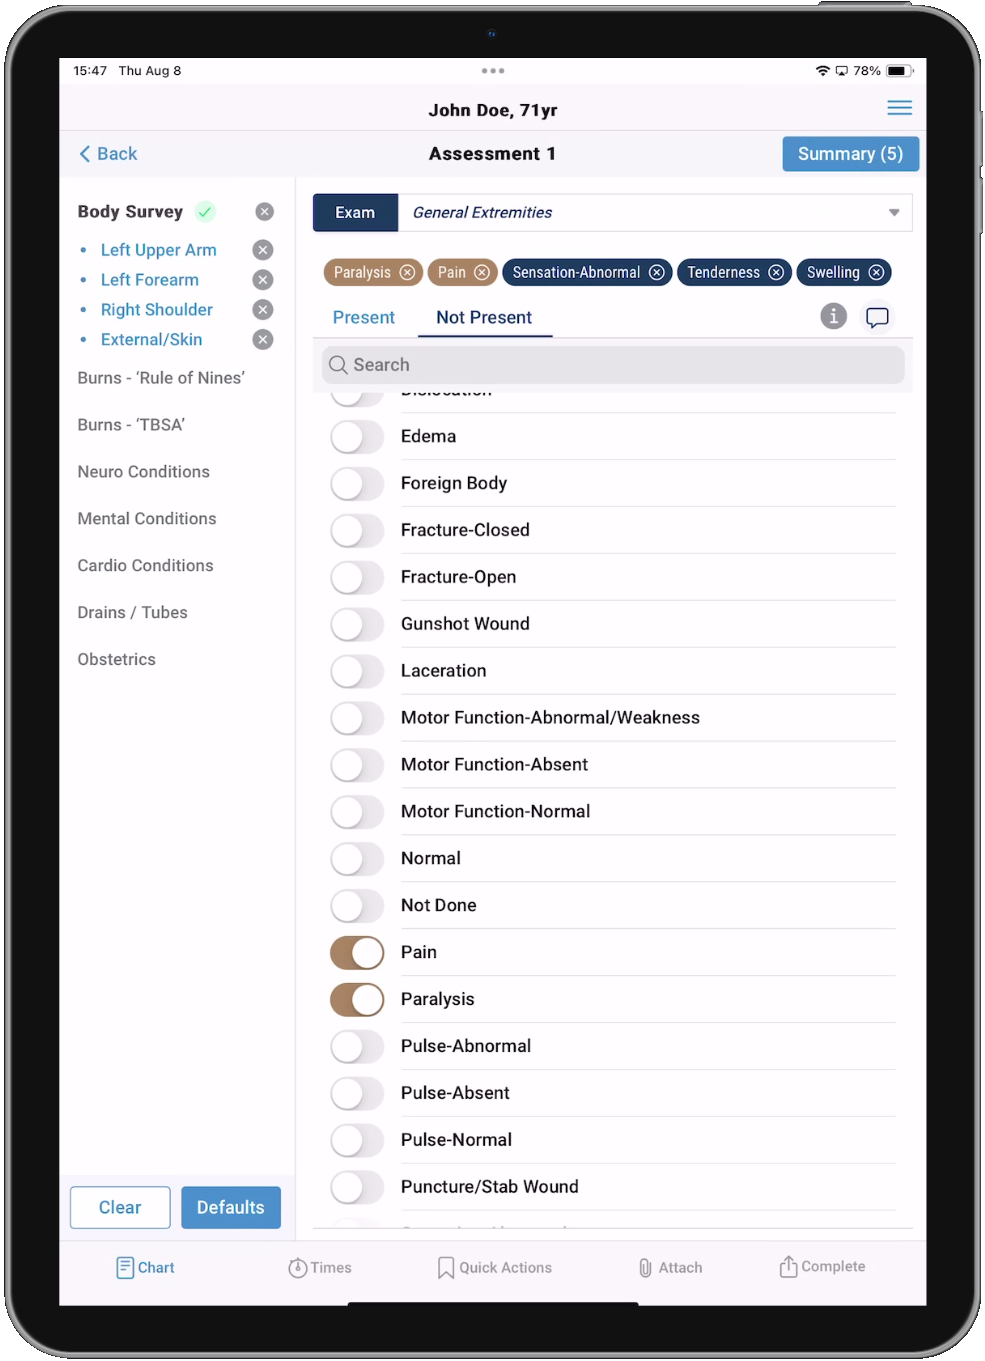
The fourth section is Neuro Conditions.
![]()
The Neuro Conditions Present and Not Present multi-select lists will display. Selected values will be added as a chip above the Present and Not Present tabs. Present selections are blue and Not Present are gold. If the list is longer than the screen, you can tap and hold to scroll left and right to see all the documented selections.
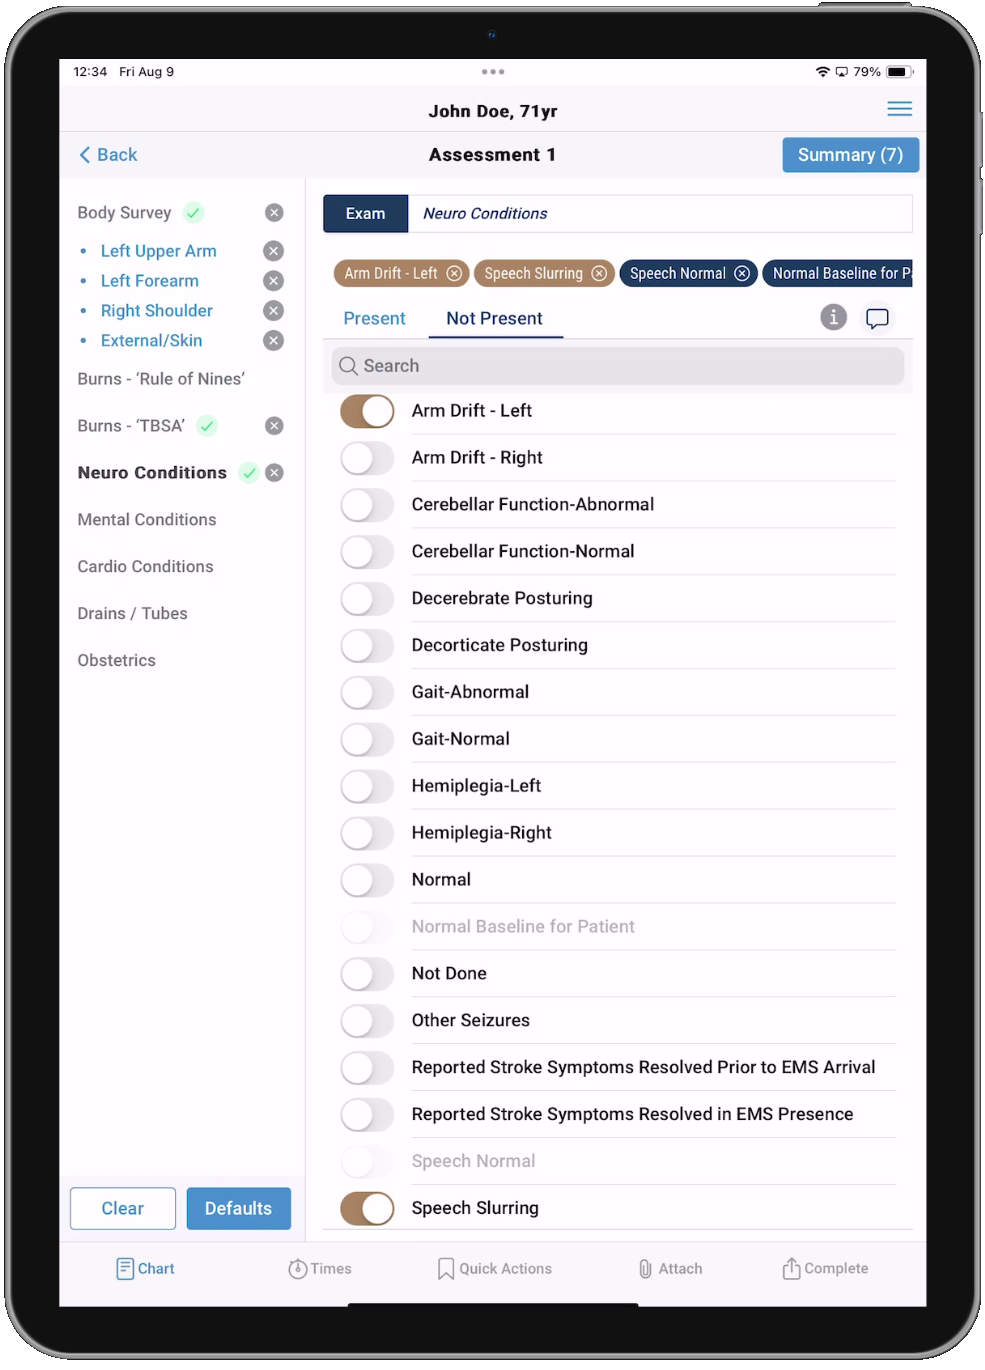
With your findings documented, you can move on to another Assessment section or tap Back until you are back to the main Assessments page or back to the Patient Care Report page.
Notes:
-
Present values are conditions that are present in the examination.
-
Not Present values are conditions that are pertinent to the injury but are not present.
-
You cannot choose the same value for both Present and Not Present. Selections made for Present will be grayed out and not selectable for Not Present, and vice versa.
The fifth section is Mental Conditions.
![]()
The Mental Conditions Present and Not Present multi-select lists will display. Selected values will be added as a chip above the Present and Not Present tabs. Present selections are blue and Not Present are gold. If the list is longer than the screen, you can tap and hold to scroll left and right to see all the documented selections.

With your findings documented, you can move on to another Assessment section or tap Back until you are back to the main Assessments page or back to the Patient Care Report page.
Notes:
-
Present values are conditions that are present in the examination.
-
Not Present values are conditions that are pertinent to the injury but are not present.
-
You cannot choose the same value for both Present and Not Present. Selections made for Present will be grayed out and not selectable for Not Present, and vice versa.
The sixth section is Cardio Conditions.
![]()
The Cardio Conditions Present and Not Present multi-select lists will display. Selected values will be added as a chip above the Present and Not Present tabs. Present selections are blue and Not Present are gold. If the list is longer than the screen, you can tap and hold to scroll left and right to see all the documented selections.
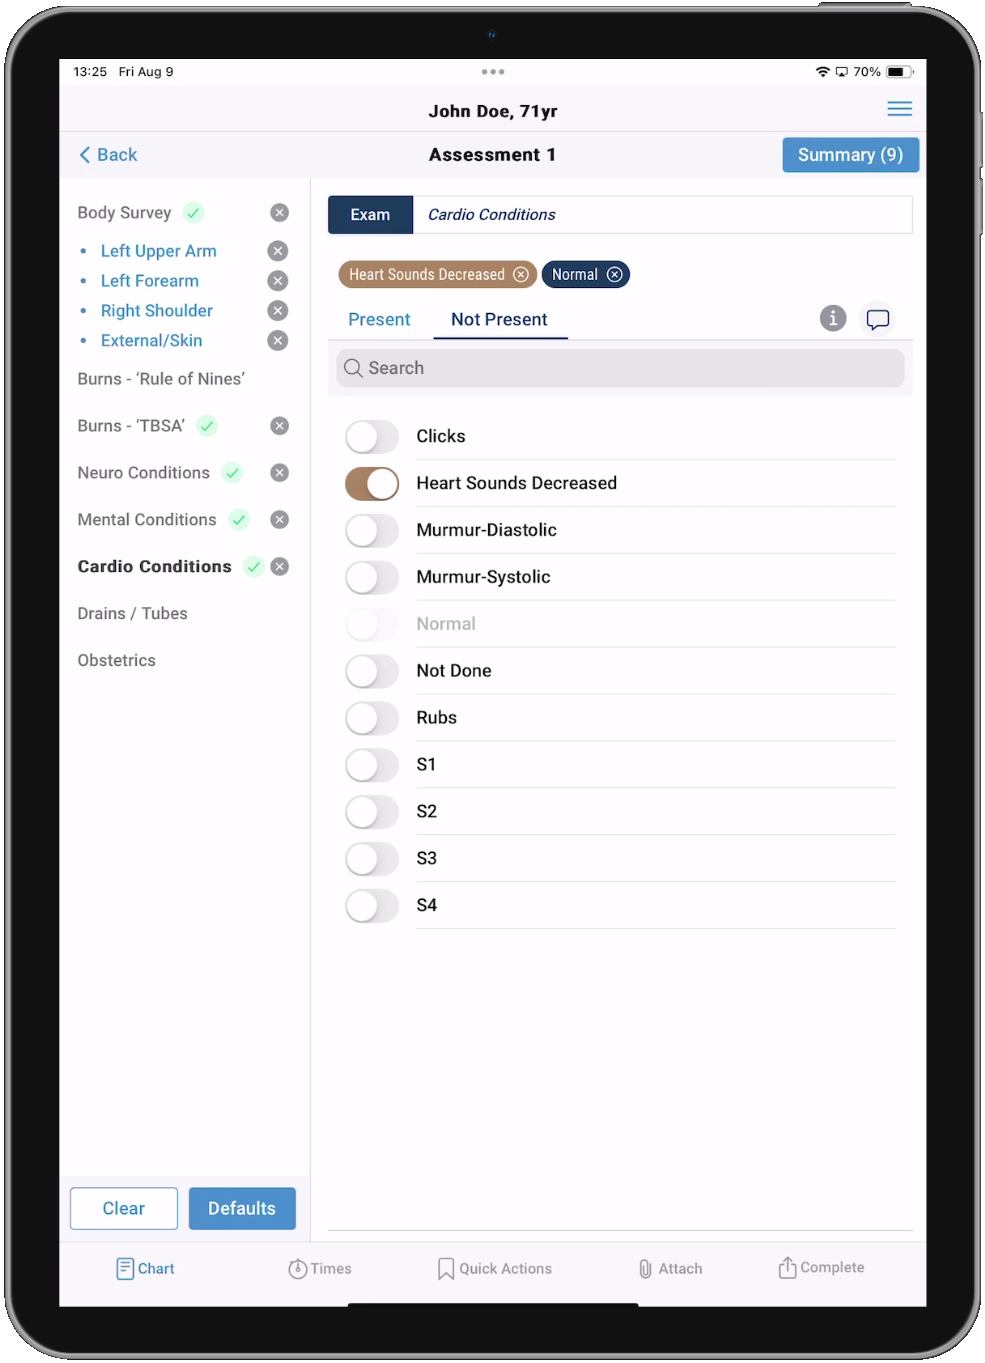
With your findings documented, you can move on to another Assessment section or tap Back until you are back to the main Assessments page or back to the Patient Care Report page.
Notes:
-
Present values are conditions that are present in the examination.
-
Not Present values are conditions that are pertinent to the injury but are not present.
-
You cannot choose the same value for both Present and Not Present. Selections made for Present will be grayed out and not selectable for Not Present, and vice versa.
The seventh section is Drains / Tubes.
Drains / Tubes will only display if the Staffing Level on the Trip Information page is set to an ALS value. Drains / Tubes consists of free-text and single-select fields and a toggle.

With your findings documented, you can move on to another Assessment section or tap Back until you are back to the main Assessments page or back to the Patient Care Report page.
The eighth section is Obstetrics.
Obstetrics will only display if it is enabled in your Command Facility configuration. Obstetrics consists of free-text, single-select, multi-select, numeric, and date/time fields.
Configuration: Command Fac. > Chart > Page 5 > Obstetrics
![]()
With your findings documented, you can move on to another Assessment section or tap Back until you are back to the main Assessments page or back to the Patient Care Report page.
Edit or Delete Assessments
From the main Additional Assessments page, you can swipe left on any existing Assessment and then tap Delete to remove it from the PCR.

You can also tap on any individual Assessment to see the Summary for that Assessment. The Summary page is organized by Assessment sections so you can quickly see all the examinations performed and the results.
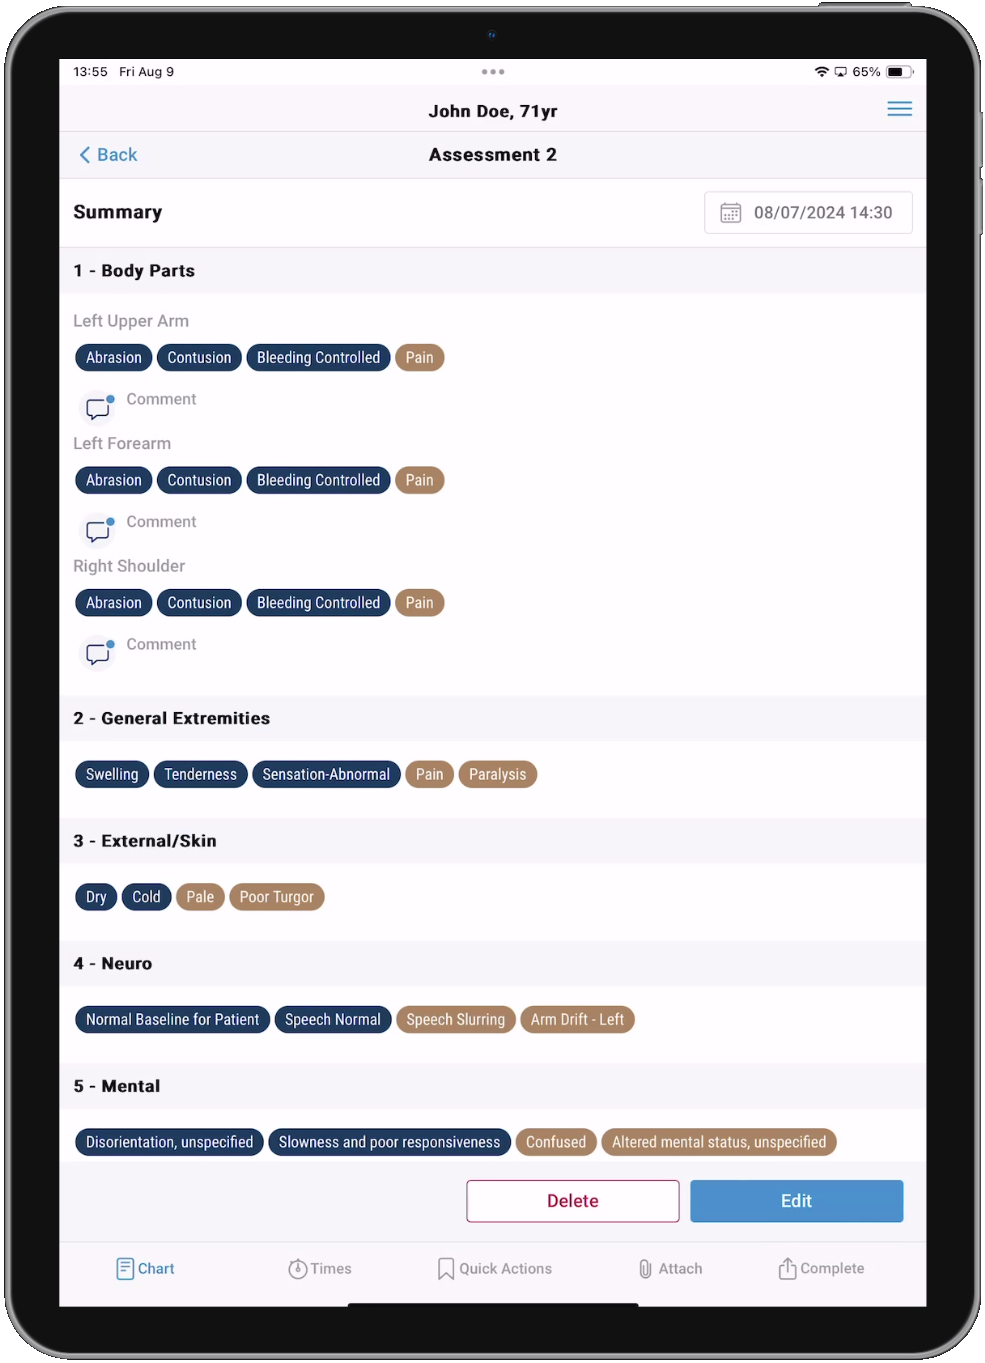
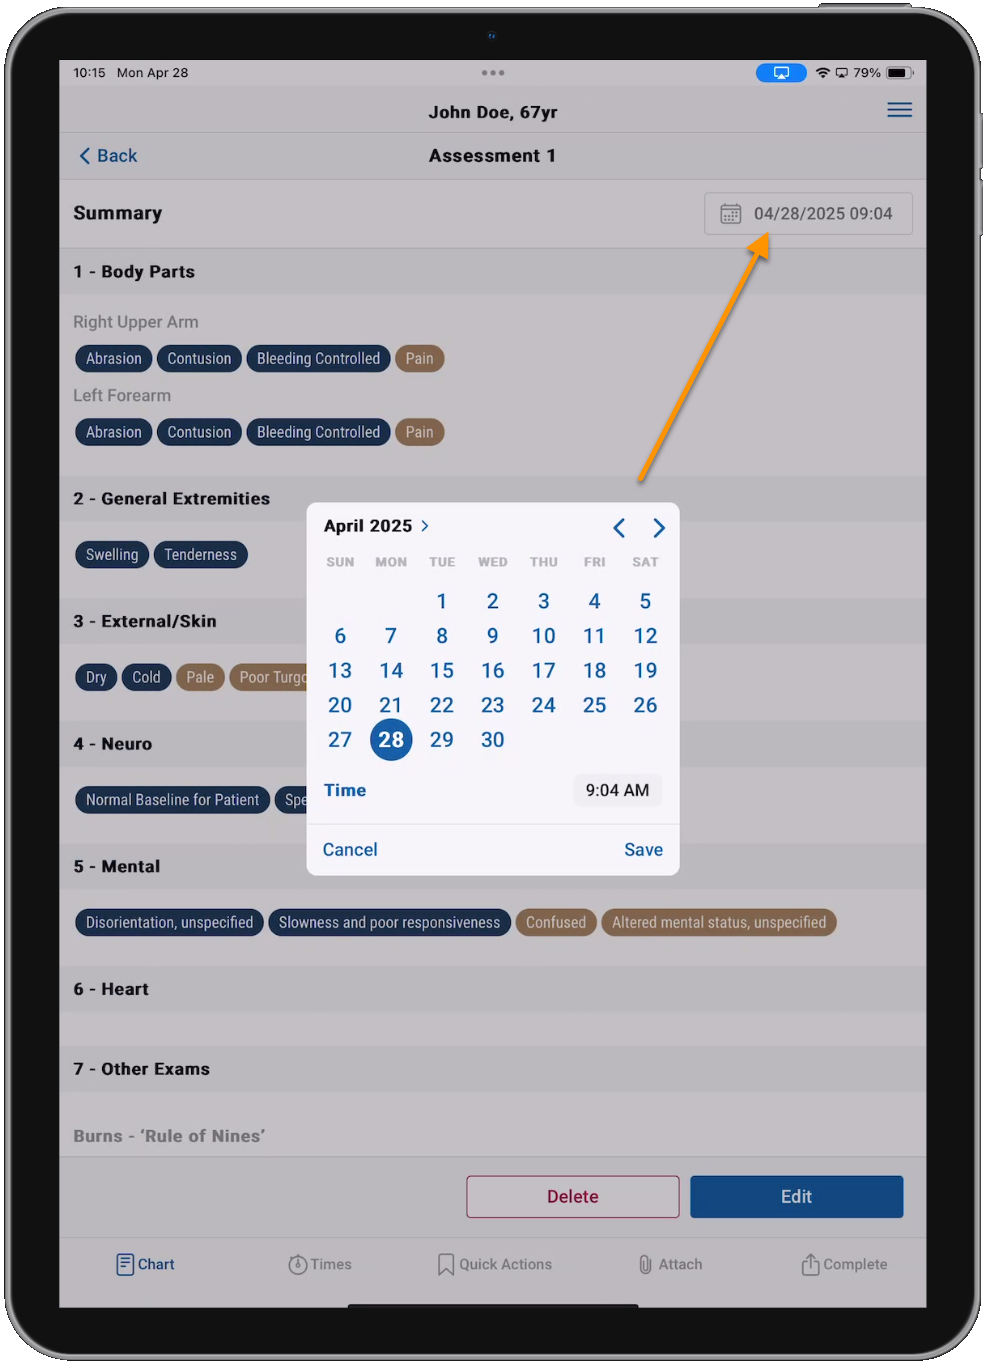
Tap the date in the upper right to modify the date/time of the Assessment.
Tap Delete at the bottom to delete the entire Assessment.

Tap Edit to make changes to the Assessment. There are multiple things you can do in edit mode.
-
While in edit mode, tap the radio button next to any Assessment section, and then tap Delete to remove that section from the Assessment.

-
While in edit mode, tap the stylus icon
for a specific section to go to that section for editing.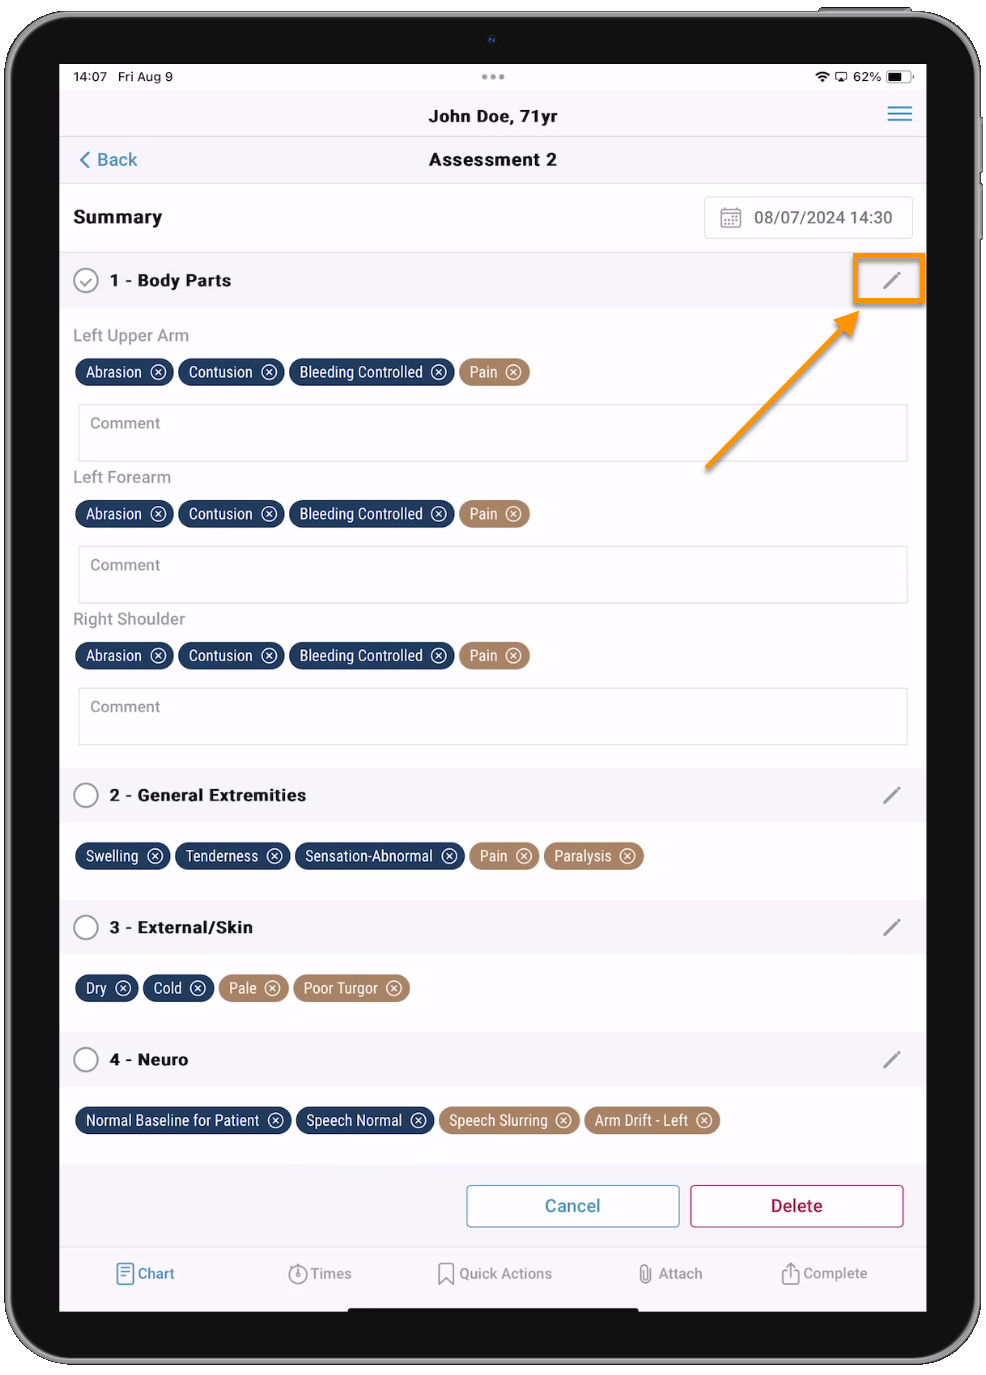
-
Editing an Assessment works the same as creating an Assessment, the only difference is that data will already be saved in the Assessment. You can modify or delete any of the saved data, and can document new findings in any of the Assessment sections.
-
When you are finished making changes, tap Summary to go back to the Summary page, or tap Back until you are back to the main Assessments page or back to the Patient Care Report page.
-
Continue to the Narrative page or go back to the Patient Care Report landing page.